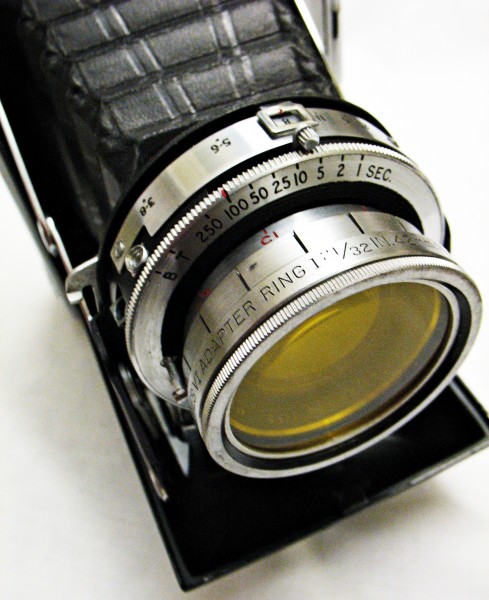
Series V Yellow Filter on 1950 Ross Lens, Ensign 820 Folding Camera.
While there is a plethora of information available in books and on the Web about vintage camera and lens systems, almost nothing is written today about the design and use of photographic filter systems between 1915 and 1950. To some extent, this is understandable, since digital image manipulation in Photoshop has largely replaced the effects of colored pieces of glass placed between the image and the film. Yet the lack of attention to vintage filters is unfortunate, as this era covers the development of an entire science of photographic filtration, and the growth of an aspect of photographic art that allowed creative effects never dreamed of in the earliest days of exposing silver salts to light.
The pre-digital film photographer might cope with film balanced for indoor tungsten light, daylight print film, daylight slide film, or any one of a number of black-and-white films. Velvia slide film, beloved of nature photographers, was very sensitive to greens and made pimples and blemishes glaringly obvious if used to photograph skin tones, while Kodak Gold, meant to lend a pleasing glow to family snapshots, tended toward warm tones, and was less optimal for nature shots. A professional photographer might carry an entire menagerie of filters tailored to manipulating images from a variety of films and lighting conditions. Each of these filters absorbed a certain percentage of the light from the image, in an amount expressed by a filter factor. When using a single lens reflex 35 mm camera with through the lens metering, this light loss was automatically taken into account by the exposure meter. With a rangefinder camera or vintage folder, the photographer was constantly consulting filter tables or doing mental calculations, juggling f-stops or shutter speeds to compensate for this light loss.
The complexity of photographic light filtration in the age of film can be appreciated from the table of Wratten filter numbers in the Appendix to this article. The digital age has enormously simplified this complex science. The decline of the photographic filter is attested to by the difficulty of finding this information today; where tables of this sort were plentiful on the World Wide Web twenty or thirty years ago, this is one of the few that can still be found anywhere on the internet. With the advent of digital photography, most of these filters have become redundant, as the majority of these effects can be achieved readily in Photoshop.
For those who are not familiar with the numerous filters employed in film photography, excellent general references on filters in the age of film can be found on either Ira Tiffen’s web site, or on the Ridgewood Camera Club‘s site, while the Portrait Professional web site has a good reference on filters for beginners. Given the availability of these excellent reviews, I will not attempt to enumerate the many subtleties possible with colored filers and film.
FILTER FACTORS
One of the most complex and cumbersome concepts involved in photgraphic light filtration was (and still is) the aforementioned filter factor. This number expresses the amount by which an exposure must be multiplied to compensate for the light lost through the filter. In practical terms, knowing that the filter factor is 2.7 is essentially useless when one is faced with adjusting the f-stop scale. Consequently, numerous tables were devised to convert filter factors to f-stops, a typical example being:
| Filter Factor | f/stops | Filter Factor | f/stops | |
| 1x | — | 4x | +2 | |
| 1.2x | +1/4 | 4.8x | +2 1/4 | |
| 1.25x | +1/3 | 5x | +2 1/3 | |
| 1.4x | +1/2 | 5.7x | +2 1/2 | |
| 1.6x | +2/3 | 6.4x | +2 2/3 | |
| 1.7x | +3/4 | 6.8x | +2 3/4 | |
| 2x | +1 | 8x | +3 | |
| 2.4x | +1 1/4 | 9.5x | +3 1/4 | |
| 2.5x | +1 1/3 | 10x | +3 1/3 | |
| 2.8x | +1 1/2 | 11.4x | +3 1/2 | |
| 3.2x | +1 2/3 | 13.5x | +3 3/4 | |
| 3.4x | +1 3/4 | 16x | +4 |
(From Joe Miller’s “Filters in Black and White Photography” site.)
While applying a filter factor is a relatively simple maneuver for the few well-known filters that one carries and uses every day, the overall topic of filter factors can be complicated. A straightforward discussion distilled from the Ridgewood Camera Club site is given in Appendix 1.
WHICH FILTERS TO USE TODAY?
For the two film types and hybrid processing approach that I employ (images taken on film, then scanned and processed in Photoshop), I use only three filters: polarizing, red, and yellow. In addition, I employ three close-up lenses with my two cameras (Graphic and Voigtlander Avus) that have ground-glass focusing. Realistically, I can probably easily duplicate in Photoshop the effects of the red and yellow filters on black and white images, but these were the classic filters used to enhance contrast and cloud effects, and I enjoy starting of with negatives having this classic look, then touching up the image in Photoshop.
The one essential filter whose effects cannot be duplicated in Photoshop is the polarizing filter; this kind of camera equipment can be purchased from Edmund Optics. Light waves typically vibrate in all directions – in technical terms, this means that the “electric vector” of the light wave is oriented in random directions perpendicular to the direction of travel of the ray of light. Most scenes, even on dull days, contain some quantity of reflected light from leaves, water, road surfaces, etc., and the amount or reflected light under bright conditions can be considerable. Reflected light causes glare and makes colours look muddy.
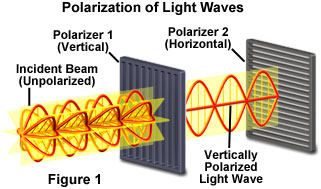
Natural, Randomly Polarized Light and the Effect of a Polarizing Filter (From Nikon Photography site)
Enter the polarizing filter. When light is reflected from a surface, the reflected light vibrates on only one direction. Similarly, light coming from the sky is partially polarized in certain directions, i.e., at right angles to the sun. A polarizing filter in front of the lens will remove these interfering sources of reflected light, brightening colors and increasing contrast. Similarly, polarizing filters used with pictures taken at right angles to the sun result in dramatic darkening of the sky. These effects are well known and are discussed in all of the references. There is no known application or Photoshop plugin that can mimic these effects. Consequently, one needs, and will repeatedly use, a functioning polarizing filter.
Unfortunately, finding a functioning classic polarizing filter is almost impossible. Polaroid film, invented in 1929 and further developed in 1932 by Edwin Land, consists of a thin film of polyvinyl alcohol stretched and impregnated with iodine. The stretched PVA polymer chains form an array of aligned, linear molecules within in the film. The iodine dopant attaches to the PVA molecules, making them conducting along the length of the chains. Light polarized parallel to the chains is absorbed, while light polarized perpendicular to the chains is transmitted.
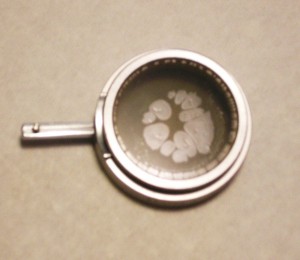
Kodak Series V Polarizing Filter. Note degenerative changes to the Polaroid film layer (from eBay advertisement).
Polaroid filters consists of a layer of PVA film sandwiched between two pieces of optical glass. Over the course of fifty years, the PVA film deteriorates, and only rare polarizing filters from the 1950s or 1960s are still usable. Furthermore, the polarizing power of filters of this vintage seems less than that of modern filters. Consequently, this is one area where one should “cheat” on using truly vintage equipment and employ a modern polarizing filter in a classic holder. I have one intact and functioning Series polarizing filter, and I treat it like the irreplacable jewel that it is.
Note that there are two kinds of polarizing filter: the linear polarizer, a staple of photographic light filtration for many decades, and the newer circular polarizer, required when cameras developed autofocus capability. The beam splitting mechanism in an autofocus camera has a built in polarizing element, and these mechanisms will not operate properly when dealing with linearly polarized light. A circular polarizer includes a quarter-wave plate that causes the electric vector of the light passing through the filter to rotate. Autofocus mechanisms perceive circularly polarized light as indistinuishable from unpolarized light, and consequently work quite happily with a circular polarizer in place.
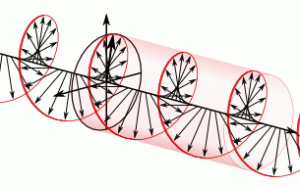
Circularly Polarized Light (with thanks to Wikipedia)
Linearly and circularly polarized light are indistinguishable to the eye or to film, and both types of polarizers decrease reflection and deepen colors to the same extent. Since classic cameras almost universally lack anything resembling an autofocus mechanism, they can use either kind of polarizer. The older linear polarizers are usually cheaper, and one can afford to buy a better quality filter.
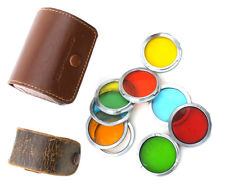
The majority of colored filters seem to be more long-lasting than polarizing filters, and it is easier to find usable vintage colored filters in classic holders. Colored filters are of two types: plastic layers sandwiched between layers of optical-quality glass, then mounted in an aluminum or brass ring, and solid filters made from a single piece of tinted glass. Some of the former deteriorate and show central fading or other forms of breakdown of the plastic layer, especially if they have been exposed to heat or sunlight, but many are in excellent condition. Solid filters are less common, as their manufacture required uniformly dyeing a complete sheet of optical-quality glass. They tend to chip on the edge and need to be handled carefully, but if they have not been scratched, are frequently very durable and may be cleaned to near-new condition.
CLASSIC FILTERS ARE DIFFERENT!
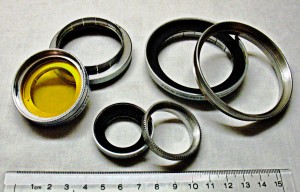
Modern photographers accustomed to the screw-on filters used since the 1950s will immediately note that classic cameras used a completely different system, often referred to as “Series” filters. Classic cameras from the 1900s through the 1950s had no threads on the lens, and all filters (and close-up lenses) consisted of
Classic Filter with Filter Holder and Retaining Ring
nonthreaded disks that dropped into a system of push-on filter holders with retaining rings. All filters came in a series of of defined sizes designated by their “Series” numbers, and fitting to the lens came from choosing the correct size of the push-on
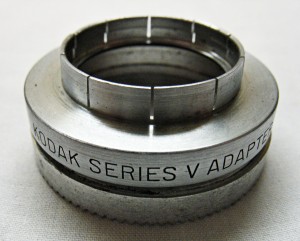
Adapter Ring Assembly. Note that this is a Series V filter holder.
ring of the filter holder. This was actually a very functional and efficient system, and was especially convenient for those who owned cameras from different manufacturers. One simply chose a set of filters to fit the largest-diameter lens, then
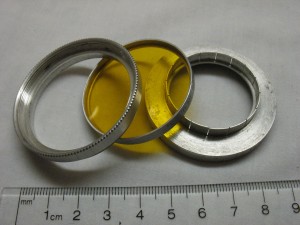
Filter (Sandwich Type with Aluminum Ring) with Filter Adapter and Retaining Ring
bought a filter holder sized for each lens. This was, in some respects, easier than using today’s system of screw-on filters and adapter rings.
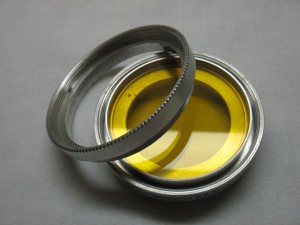
Assembling the Filter and Holder (Adapter)
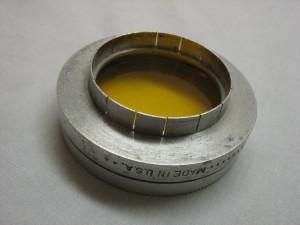
Completed Filter Assembly Waiting to be Mounted onto the Lens
If a lens hood was needed, the hood became part of the filter assembly, and was screwed into the filter assembly in place of the retaining ring, holding the filter in place and shading the lens:
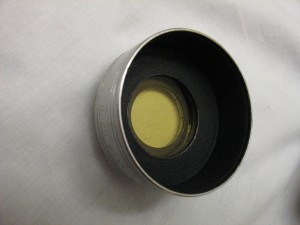
Filter Assembly with Lens Hood in Place of Retaining Ring
Alternatively, if only a hood is needed, the lens hood could be screwed into the adapter without a filter, and the hood assembly could be pushed into place over the lens:
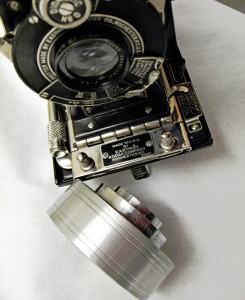
1928 Kodak and Lens Hood with Adapter
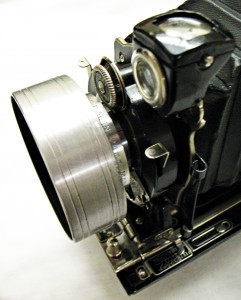
Lens Hood in Place on 1928 Kodak Anastigmat Lens
Finding and mounting a modern polarizing filter into a Series-type filter adapter is challenging and may require extensive shopping and experimentation with available materials. The main challenge lies in finding a modern filter of appropriate size. Most modern polarizing filters with threaded rings are too thick to fit a Series adapter with the ring in place, and the ring will, in most cases, need to be removed. Selecting a possible candidate for modification therefore involves taking one’s Series filter adapters to a camera store with a good selection of used polarizing filters, selecting a filter that looks as if it will fit the holder after the threaded ring has been removed, then carefully cutting and removing the ring without damaging the filter. If the filter is slightly large, it may be carefully ground to size by hand, preferably under dry conditions without lubricant, on carborundum paper or a sharpening stone. This is a tedious process, and should not be attempted if significant resizing is required. It is difficult to avoid damaging the Polaroid layer or getting paricles or lubricant between the layers of glass, and using powered grinders most frequently results in chipping of the edge of the filter and melting the Polaroid layer.
The Series system included specific polarizing filter holders with attached handles. These typically did not include the rotating-ring stsem used in modern screw-in filters, and depended on rotating the threads for alignment of the polarizer. If one of these can be found, the old polarizer can be removed and the new one cemented in place with a minimal amount of silicone sealant.
The following table, adapted from the APOTELYT site, shows the filter disk and retaining rings sizes, as well as the range of lens sizes accomodated, for each of the Series numbers. Included are designations for the rarely-found half-size Series filters as well as some specialized larger filters:
|
Filter Designation |
Filter Diameter |
Retaining Ring Size |
Lens Diameter |
||
|
Inches |
mm |
Inches |
mm |
||
| Series IV | 13/16 | 20.6 | 15/16 | 23.5 | 16-18 |
| Series 4.5 | 1 | 25.5 | |||
| Series V | 1 3/16 | 30.2 | 1 1/4 | 33.5 | 19-30 |
| Series 5.5 | 1 19/32 | 35.9 | |||
| Series VI | 1 5/8 | 41.3 | 1 3/4 | 44.0 | 30.5-42 |
| Series 6.5 | 1 7/8 | 48.0 | |||
| Series VII | 2 | 50.8 | 2 1/8 | 54.3 | 42.5-50.5 |
| Series 7.5 | 2 1/4 | 57.0 | |||
| Series VIII | 2 1/2 | 63.5 | 2 5/8 | 66.7 | 51-67 |
| Series 8.5 | 2 15/16 | 74.8 | |||
| Series IX | 3 1/4 | 82.6 | 3 7/16 | 87.5 | 67-85 |
| Series 93 | 3 21/32 | 93.0 | |||
| Series 103 | 4 1/16 | 103 | |||
| Series 107 | 4 7/32 | 107 | |||
| Series X | 4 1/2 | 114 | |||
| Series 119 | 4 11/16 | 119 | |||
| Series 125 | 4 15/16 | 125 | |||
The push-on section of the filter holder consists of a ring of short aluminum fingers that can be bent in or out to adjust the size of the ring by about 1 mm. The aluminum is soft and should not score the lens’ outer ring, but it is advisable to ensure that all of the edges of the adapter fingers are parallel and the inside of the ring is gently sanded with fine carborundum paper to minimize the risk of scratching the camera’s lens ring.
One of the more charming and interesting aspects of classic filter systems was the many boxes, bags, and cases designed to hold the multiplicity of filters needed by the pre-digital photographer. Of these, the most striking were Kodak’s little yellow and black cases. Sturdy and extremely durable, they consisted of a black base filled with two layers of a soft fiber mat, covered with a distinctive yellow screw-on cap:
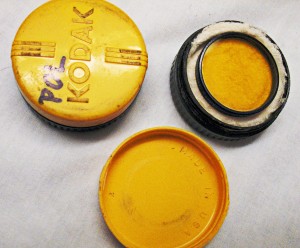
Yellow filter and Kodak Filter Cases. Note original paper padding in case.
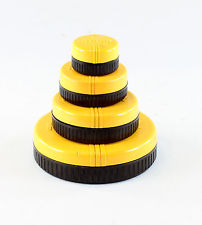
Kodak Filter Cases (from eBay advertisement).
| References:
APOTELYT. “Series Filters – A modular drop-in system.” http://www.apotelyt.com/photo-accessory/series-filters. Dancy, M and Christian, W. “Polarization Exploration.” http://webphysics.davidson.edu/physlet_resources/dav_optics/examples/polarization.html Fokkelman, J. W. “Filters, Portrait Lenses and Lenshoods.” Camera Shopper 238:11, August-September 2013. Hannavy, J. “Wratten, Frederick Charles Luther.” Encyclopedia of Nineteenth-Centeruy Photography. Taylor and Francis, 2007, p. 1514. HyperPhysics. “Classification of Polarization.” http://hyperphysics.phy-astr.gsu.edu/hbase/phyopt/polclas.html Miller, J. “Filters in Black and White Photography.” http://www.fineart-photography.com/bwfilter.html Nikon Microscopy. “Introduction to Polarized Light.” http://www.microscopyu.com/articles/polarized/polarizedlightintro.html Peed, Allie C. “Transmission of Wratten Filters.” http://image.eastmanhouse.org/files/GEH_1961_10_01.pdf Portrait Professional. “Camera Lens Filters Explained.” http://www.exposureguide.com/lens-filters.htm Ridgewood Camera Club. “Filters.” http://www.ridgewoodcameraclub.org/documents/Filters.pdf. Rockwell, Ken. “Filters.” http://www.kenrockwell.com/tech/filters.htm Silverbased.org. “What Are ‘Series’ Filters?” http://silverbased.org/series-filters/ SongofSnow. “What Are ‘Series’ Accessories?” http://www.songofsnow.com/Articles.asp?ID=121 Tiffen, I. “Camera Filters.” http://www.tiffen.com/camera_filters.htm Wikipedia. “Circular Polarization.” http://en.wikipedia.org/wiki/Circular_polarization. Wikipedia. “Filter Factor.” http://en.wikipedia.org/wiki/Filter_factor. Wikipedia. “Frederick Wratten.” http://en.wikipedia.org/wiki/Frederick_Wratten Wikipedia. “Polaroid.” http://en.wikipedia.org/wiki/Polaroid_%28polarizer%29. Wikipedia. “Wratten Number.” http://en.wikipedia.org/wiki/Wratten_number Appendix 1: Using Filter Factors (adapted from the Ridgewood Camera Club site): EXPOSURE COMPENSATION Most filters absorb some light. Since less light strikes the film, exposure must be increased to compensate for this loss by opening the aperture wider or by increasing the time that the shutter is open. This is known as “exposure compensation,” because you are compensating for the filter’s effect on exposure. The additional exposure varies with the particular filter in use: some filters, like the Wratten No. 25 deep red filter for use with black and white film, are so dense that they require exposure compensation of four stops, while others like the UV filter are transparent and completely neutral with respect to visible light, requiring no compensation at all. FILTER FACTOR The amount of exposure compensation has been predetermined for every filter, and is expressed as a “filter factor” (sometimes also called an exposure factor, and also referred to as Exposure Magnification or EM values). A filter factor is a number that indicates to what extent you must increase exposure when you use a particular filter by multiplying the unfiltered exposure by the filter factor number. A filter factor of 2, for example, means you will need twice as much exposure, and a filter factor of 3 means you will three times as much exposure. HOW TO USE A FILTER FACTOR First obtain a meter reading of the scene you wish to photograph without the filter. With a hand-held meter, this is easily done. If you are using a through-the-lens meter, take your reading with no filter attached. If your filter has a filter factor of, say 2, which you know requires twice as much exposure, you must increase exposure by one stop, allowing twice as much light to reach the film. If your meter reading without the filter was 1/250 sec. at ƒ11, you must either decrease the shutter speed by one stop to 1/125 sec, or increase the aperture by one stop to ƒ8. If you take your picture at the new exposure setting with the filter attached, the film will be properly exposed. A filter factor of 4 means the film requires four times as much light to be properly exposed. You must therefore increase exposure by two stops, since each stop doubles the amount of light that gets through to the film. Using the example from the paragraph above, if your meter reading without the filter was 1/250 at ƒ11, you must either decrease the shutter speed by two stops to 1/60 sec or increase the aperture by two stops to ƒ5.6. But what if the filter factor is 3? How many stops is that? A filter factor of 3 requires three times more exposure. Since a one-stop increase doubles the amount of light reaching the film, and a two-stop increase quadruples the amount of light reaching the film, your exposure increase for a filter with a factor of 3 will be between one and two stops. It is, in fact, 1 2/3 stops. In this case, one must use one of the conversion tables to change the filter factor into an f-stop adjustment. THE EASY WAY- CHANGE SHUTTER SPEEDS There is an easy way to compensate for filter factor. Take a normal exposure reading as if you were shooting without a filter, and adjust your camera settings accordingly. Now, multiply the filter factor by the shutter speed. For example, if the filter factor is 4 and your shutter speed is 1/500 sec, multiply 4 X 1/500 = 4/500 or 1/125. You can now use that filter by changing your shutter speed to 1/125 sec while keeping your aperture setting the same. AN EVEN EASIER WAY- CHANGE THE FILM SPEED A fast, efficient way to compensate for the use of a filter is to divide the factor into the film speed. ISO 100 film divided by a filter factor of 2 equals 50. Set your camera’s light meter or your hand-held meter at this new ISO rating when using the filter (unless your camera is an SLR with TTL metering, in which case, the camera’s meter will automatically compensate for the filter, and provide you with a proper exposure reading). WHAT IF I USE MORE THAN ONE FILTER? Using two or three filters at the same time will require an increase in exposure based on the factors of each filter, calculated by multiplying the factors together. For example, the combined factor when stacking three filters that each have a filter factor of 2 is 2 X 2 X 2 = 8, which requires an increase in exposure of three additional stops. WHAT IF I DON’T KNOW THE FILTER FACTOR? If you have no indication what the factor is for a particular filter and you aren’t using TTL metering, you can use a hand-held meter, preferably with the translucent dome removed (or ideally the meter will have a flat diffuser). Take a normal exposure reading of the sky or another unchanging light source, then take another reading with the filter over the meter’s sensor, making sure no light is getting in at the sides. The difference in the readings will give you the increase in the number of ƒ-stops necessary for you to use the filter, and you can easily convert this to a filter factor number for future reference. HOW ACCURATE ARE FILTER FACTORS? Filter factors are applicable under average lighting conditions, and therefore should be considered as a reliable guideline, but should not necessarily be treated as definitive. You may find that applying a particular filter factor results in over or under-exposure most times you use a given filter, which means that the filter factor is inaccurate for much of your photography. You will need to further adjust your exposure one way or the other when using that filter. Once you know how much of an adjustment is needed, then you can assign your own factor to that particular filter for future reference. The other thing about filter factors is that you can use some leeway in applying them. Intentional underexposure by half a stop or so will often improve a scene by adding more contrast when using certain filters. Experimentation will let you know how far you can veer away from the recommended filter factor, and what the effects are on your pictures when you do. Keep in mind, too, that a filter factor of 2 can even be ignored completely with the wide exposure latitude of most black and white films without affecting the image too much. Appendix 2: The Wratten Filter System The modern system of colored filters immortalizes the name of Frederick Charles Luther Wratten, British photographic inventor and founder of the first photographic supply company. In addition to introducing improvements in the manufacture of gelatin emulsions, Wratten partnered in 1877 with Henry Wainright to form Wratten and Wainwright, the first British firm to manufacture and sell dry photographic plates commercially. C.E. Kenneth Mees soon joined the company as head of product development, and was responsible for developing the panchromatic photographic plate sensitive to longer wavelengths. Mees next developed colored gelatin filters, allowing photographers to take advantage of this broadened color sensitivity, and make possible photgraphy using different wavelengths of light. Beginning with yellow and soon incorporating a variety of colours, these gelatin filters eventually became known as Wratten Filters (See Wikipedia references to Frederick Wratten and Wratten Number). Wratten and Wainwright, like so many of the early photographic companies, was purchased by Eastman Kodak in 1912, and merged with Kodak’s British division at Harrow. Wratten and his son began working at Harrow, while Mees moved to Rochester, New York to found Eastman Kodak’s research laboratories. The Wratten numbering system generally consists of a number followed by a letter. Although the letters denote increasing density of the filter, the numbers are generally arbitrary and do not follow much of a logical sequence with respect to the colour or spectral transmission curve. Of this system, Hannavy’s Encyclopedia of Nineteenth-century Photography says: “The rationale behind the numbering of his filter system seems somewhat arbitrary, but does have a basic structure to it. He started with low numbers applied to yellow filters, higher numbers applied to oranges, red and magenta, and higher numbers yet for greens and blues. Numbered between 80 and 85, he listed filters that adjusted the color temperature of the light reaching the film, with a range of miscellaneous filters occupying the range from 87 upwards. of course, with the introduction of color films, the Wratten filter system has been updated and expanded but, almost a century after their introduction, Wratten numbers are still the most commonly used to denote a filter’s color and character…” Appendix 3: Charts for Using the Wratten Filter system (From the Camera Craft web site, based on data from Tiffen Manufacturing Corporation) Filters Primarily for Black & White Films
Filters Primarily for Color Films
Filters Commonly Used for both Black & White and Color Films
|