Vintage Filter Systems: The “Series” Filters

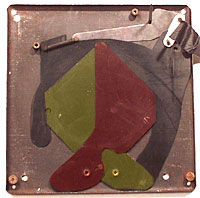
Series V Yellow Filter on 1950 Ross Lens, Ensign 820 Folding Camera.

While there is a plethora of information available in books and on the Web about vintage camera and lens systems, almost nothing is written today about the design and use of photographic filter systems between 1915 and 1950. To some extent, this is understandable, since digital image manipulation in Photoshop has largely replaced the effects of colored pieces of glass placed between the image and the film. Yet the lack of attention to vintage filters is unfortunate, as this era covers the development of an entire science of photographic filtration, and the growth of an aspect of photographic art that allowed creative effects never dreamed of in the earliest days of exposing silver salts to light.

The pre-digital film photographer might cope with film balanced for indoor tungsten light, daylight print film, daylight slide film, or any one of a number of black-and-white films. Velvia slide film, beloved of nature photographers, was very sensitive to greens and made pimples and blemishes glaringly obvious if used to photograph skin tones, while Kodak Gold, meant to lend a pleasing glow to family snapshots, tended toward warm tones, and was less optimal for nature shots. A professional photographer might carry an entire menagerie of filters tailored to manipulating images from a variety of films and lighting conditions. Each of these filters absorbed a certain percentage of the light from the image, in an amount expressed by a filter factor. When using a single lens reflex 35 mm camera with through the lens metering, this light loss was automatically taken into account by the exposure meter. With a rangefinder camera or vintage folder, the photographer was constantly consulting filter tables or doing mental calculations, juggling f-stops or shutter speeds to compensate for this light loss.

The complexity of photographic light filtration in the age of film can be appreciated from the table of Wratten filter numbers in the Appendix to this article. The digital age has enormously simplified this complex science. The decline of the photographic filter is attested to by the difficulty of finding this information today; where tables of this sort were plentiful on the World Wide Web twenty or thirty years ago, this is one of the few that can still be found anywhere on the internet. With the advent of digital photography, most of these filters have become redundant, as the majority of these effects can be achieved readily in Photoshop.

For those who are not familiar with the numerous filters employed in film photography, excellent general references on filters in the age of film can be found on either Ira Tiffen’s web site, or on the Ridgewood Camera Club‘s site, while the Portrait Professional web site has a good reference on filters for beginners. Given the availability of these excellent reviews, I will not attempt to enumerate the many subtleties possible with colored filers and film.

FILTER FACTORS

One of the most complex and cumbersome concepts involved in photgraphic light filtration was (and still is) the aforementioned filter factor. This number expresses the amount by which an exposure must be multiplied to compensate for the light lost through the filter. In practical terms, knowing that the filter factor is 2.7 is essentially useless when one is faced with adjusting the f-stop scale. Consequently, numerous tables were devised to convert filter factors to f-stops, a typical example being:

Converting Filter Factors
to f/stops
Filter Factor f/stops Filter Factor f/stops
1x 4x +2
1.2x +1/4 4.8x +2 1/4
1.25x +1/3 5x +2 1/3
1.4x +1/2 5.7x +2 1/2
1.6x +2/3 6.4x +2 2/3
1.7x +3/4 6.8x +2 3/4
2x +1 8x +3
2.4x +1 1/4 9.5x +3 1/4
2.5x +1 1/3 10x +3 1/3
2.8x +1 1/2 11.4x +3 1/2
3.2x +1 2/3 13.5x +3 3/4
3.4x +1 3/4 16x +4

(From Joe Miller’s “Filters in Black and White Photography” site.)

While applying a filter factor is a relatively simple maneuver for the few well-known filters that one carries and uses every day, the overall topic of filter factors can be complicated. A straightforward discussion distilled from the Ridgewood Camera Club site is given in Appendix 1.

WHICH FILTERS TO USE TODAY?

For the two film types and hybrid processing approach that I employ (images taken on film, then scanned and processed in Photoshop), I use only three filters: polarizing, red, and yellow. In addition, I employ three close-up lenses with my two cameras (Graphic and Voigtlander Avus) that have ground-glass focusing. Realistically, I can probably easily duplicate in Photoshop the effects of the red and yellow filters on black and white images, but these were the classic filters used to enhance contrast and cloud effects, and I enjoy starting of with negatives having this classic look, then touching up the image in Photoshop.

The one essential filter whose effects cannot be duplicated in Photoshop is the polarizing filter; this kind of camera equipment can be purchased from Edmund Optics. Light waves typically vibrate in all directions – in technical terms, this means that the “electric vector” of the light wave is oriented in random directions perpendicular to the direction of travel of the ray of light. Most scenes, even on dull days, contain some quantity of reflected light from leaves, water, road surfaces, etc., and the amount or reflected light under bright conditions can be considerable. Reflected light causes glare and makes colours look muddy.

Natural, Randomly Polarized Light and the Effect of a Polarizing Filter (From Nikon Photography site)

Enter the polarizing filter. When light is reflected from a surface, the reflected light vibrates on only one direction. Similarly, light coming from the sky is partially polarized in certain directions, i.e., at right angles to the sun. A polarizing filter in front of the lens will remove these interfering sources of reflected light, brightening colors and increasing contrast. Similarly, polarizing filters used with pictures taken at right angles to the sun result in dramatic darkening of the sky. These effects are well known and are discussed in all of the references. There is no known application or Photoshop plugin that can mimic these effects. Consequently, one needs, and will repeatedly use, a functioning polarizing filter.

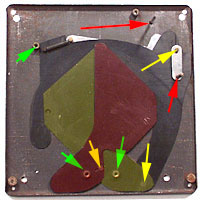
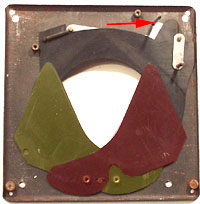
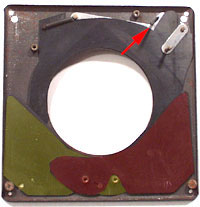
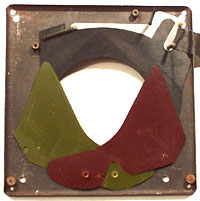
Unfortunately, finding a functioning classic polarizing filter is almost impossible. Polaroid film, invented in 1929 and further developed in 1932 by Edwin Land, consists of a thin film of polyvinyl alcohol stretched and impregnated with iodine. The stretched PVA polymer chains form an array of aligned, linear molecules within in the film. The iodine dopant attaches to the PVA molecules, making them conducting along the length of the chains. Light polarized parallel to the chains is absorbed, while light polarized perpendicular to the chains is transmitted.

Kodak Series V Polarizing Filter. Note degenerative changes to the Polaroid film layer (from eBay advertisement).

Polaroid filters consists of a layer of PVA film sandwiched between two pieces of optical glass. Over the course of fifty years, the PVA film deteriorates, and only rare polarizing filters from the 1950s or 1960s are still usable. Furthermore, the polarizing power of filters of this vintage seems less than that of modern filters. Consequently, this is one area where one should “cheat” on using truly vintage equipment and employ a modern polarizing filter in a classic holder. I have one intact and functioning Series polarizing filter, and I treat it like the irreplacable jewel that it is.

Note that there are two kinds of polarizing filter: the linear polarizer, a staple of photographic light filtration for many decades, and the newer circular polarizer, required when cameras developed autofocus capability. The beam splitting mechanism in an autofocus camera has a built in polarizing element, and these mechanisms will not operate properly when dealing with linearly polarized light. A circular polarizer includes a quarter-wave plate that causes the electric vector of the light passing through the filter to rotate. Autofocus mechanisms perceive circularly polarized light as indistinuishable from unpolarized light, and consequently work quite happily with a circular polarizer in place.

Circularly Polarized Light (with thanks to Wikipedia)

Linearly and circularly polarized light are indistinguishable to the eye or to film, and both types of polarizers decrease reflection and deepen colors to the same extent. Since classic cameras almost universally lack anything resembling an autofocus mechanism, they can use either kind of polarizer. The older linear polarizers are usually cheaper, and one can afford to buy a better quality filter.

The majority of colored filters seem to be more long-lasting than polarizing filters, and it is easier to find usable vintage colored filters in classic holders. Colored filters are of two types: plastic layers sandwiched between layers of optical-quality glass, then mounted in an aluminum or brass ring, and solid filters made from a single piece of tinted glass. Some of the former deteriorate and show central fading or other forms of breakdown of the plastic layer, especially if they have been exposed to heat or sunlight, but many are in excellent condition. Solid filters are less common, as their manufacture required uniformly dyeing a complete sheet of optical-quality glass. They tend to chip on the edge and need to be handled carefully, but if they have not been scratched, are frequently very durable and may be cleaned to near-new condition.

CLASSIC FILTERS ARE DIFFERENT!

Modern photographers accustomed to the screw-on filters used since the 1950s will immediately note that classic cameras used a completely different system, often referred to as “Series” filters. Classic cameras from the 1900s through the 1950s had no threads on the lens, and all filters (and close-up lenses) consisted of

Classic Filter with Filter Holder and Retaining Ring

nonthreaded disks that dropped into a system of push-on filter holders with retaining rings. All filters came in a series of of defined sizes designated by their “Series” numbers, and fitting to the lens came from choosing the correct size of the push-on

Adapter Ring Assembly. Note that this is a Series V filter holder.

ring of the filter holder. This was actually a very functional and efficient system, and was especially convenient for those who owned cameras from different manufacturers. One simply chose a set of filters to fit the largest-diameter lens, then

Filter (Sandwich Type with Aluminum Ring) with Filter Adapter and Retaining Ring

bought a filter holder sized for each lens. This was, in some respects, easier than using today’s system of screw-on filters and adapter rings.

Assembling the Filter and Holder (Adapter)

Completed Filter Assembly Waiting to be Mounted onto the Lens

If a lens hood was needed, the hood became part of the filter assembly, and was screwed into the filter assembly in place of the retaining ring, holding the filter in place and shading the lens:

Filter Assembly with Lens Hood in Place of Retaining Ring

Alternatively, if only a hood is needed, the lens hood could be screwed into the adapter without a filter, and the hood assembly could be pushed into place over the lens:

1928 Kodak and Lens Hood with Adapter

Lens Hood in Place on 1928 Kodak Anastigmat Lens

Finding and mounting a modern polarizing filter into a Series-type filter adapter is challenging and may require extensive shopping and experimentation with available materials. The main challenge lies in finding a modern filter of appropriate size. Most modern polarizing filters with threaded rings are too thick to fit a Series adapter with the ring in place, and the ring will, in most cases, need to be removed. Selecting a possible candidate for modification therefore involves taking one’s Series filter adapters to a camera store with a good selection of used polarizing filters, selecting a filter that looks as if it will fit the holder after the threaded ring has been removed, then carefully cutting and removing the ring without damaging the filter. If the filter is slightly large, it may be carefully ground to size by hand, preferably under dry conditions without lubricant, on carborundum paper or a sharpening stone. This is a tedious process, and should not be attempted if significant resizing is required. It is difficult to avoid damaging the Polaroid layer or getting paricles or lubricant between the layers of glass, and using powered grinders most frequently results in chipping of the edge of the filter and melting the Polaroid layer.

The Series system included specific polarizing filter holders with attached handles. These typically did not include the rotating-ring stsem used in modern screw-in filters, and depended on rotating the threads for alignment of the polarizer. If one of these can be found, the old polarizer can be removed and the new one cemented in place with a minimal amount of silicone sealant.

The following table, adapted from the APOTELYT site, shows the filter disk and retaining rings sizes, as well as the range of lens sizes accomodated, for each of the Series numbers. Included are designations for the rarely-found half-size Series filters as well as some specialized larger filters:

Filter Designation

Filter Diameter

Retaining Ring Size

Lens Diameter
(mm)

Inches

mm

Inches

mm

Series IV 13/16 20.6 15/16 23.5 16-18
Series 4.5 1 25.5
Series V 1 3/16 30.2 1 1/4 33.5 19-30
Series 5.5 1 19/32 35.9
Series VI 1 5/8 41.3 1 3/4 44.0 30.5-42
Series 6.5 1 7/8 48.0
Series VII 2 50.8 2 1/8 54.3 42.5-50.5
Series 7.5 2 1/4 57.0
Series VIII 2 1/2 63.5 2 5/8 66.7 51-67
Series 8.5 2 15/16 74.8
Series IX 3 1/4 82.6 3 7/16 87.5 67-85
Series 93 3 21/32 93.0
Series 103 4 1/16 103
Series 107 4 7/32 107
Series X 4 1/2 114
Series 119 4 11/16 119
Series 125 4 15/16 125

The push-on section of the filter holder consists of a ring of short aluminum fingers that can be bent in or out to adjust the size of the ring by about 1 mm. The aluminum is soft and should not score the lens’ outer ring, but it is advisable to ensure that all of the edges of the adapter fingers are parallel and the inside of the ring is gently sanded with fine carborundum paper to minimize the risk of scratching the camera’s lens ring.

One of the more charming and interesting aspects of classic filter systems was the many boxes, bags, and cases designed to hold the multiplicity of filters needed by the pre-digital photographer. Of these, the most striking were Kodak’s little yellow and black cases. Sturdy and extremely durable, they consisted of a black base filled with two layers of a soft fiber mat, covered with a distinctive yellow screw-on cap:

Yellow filter and Kodak Filter Cases. Note original paper padding in case.

Kodak Filter Cases (from eBay advertisement).

References:

APOTELYT. “Series Filters – A modular drop-in system.” http://www.apotelyt.com/photo-accessory/series-filters.

Dancy, M and Christian, W. “Polarization Exploration.” http://webphysics.davidson.edu/physlet_resources/dav_optics/examples/polarization.html

Fokkelman, J. W. “Filters, Portrait Lenses and Lenshoods.” Camera Shopper 238:11, August-September 2013.

Hannavy, J. “Wratten, Frederick Charles Luther.” Encyclopedia of Nineteenth-Centeruy Photography. Taylor and Francis, 2007, p. 1514.

HyperPhysics. “Classification of Polarization.” http://hyperphysics.phy-astr.gsu.edu/hbase/phyopt/polclas.html

Miller, J. “Filters in Black and White Photography.” http://www.fineart-photography.com/bwfilter.html

Nikon Microscopy. “Introduction to Polarized Light.” http://www.microscopyu.com/articles/polarized/polarizedlightintro.html

Peed, Allie C. “Transmission of Wratten Filters.” http://image.eastmanhouse.org/files/GEH_1961_10_01.pdf

Portrait Professional. “Camera Lens Filters Explained.” http://www.exposureguide.com/lens-filters.htm

Ridgewood Camera Club. “Filters.” http://www.ridgewoodcameraclub.org/documents/Filters.pdf.

Rockwell, Ken. “Filters.” http://www.kenrockwell.com/tech/filters.htm

Silverbased.org. “What Are ‘Series’ Filters?” http://silverbased.org/series-filters/

SongofSnow. “What Are ‘Series’ Accessories?” http://www.songofsnow.com/Articles.asp?ID=121

Tiffen, I. “Camera Filters.” http://www.tiffen.com/camera_filters.htm

Wikipedia. “Circular Polarization.” http://en.wikipedia.org/wiki/Circular_polarization.

Wikipedia. “Filter Factor.” http://en.wikipedia.org/wiki/Filter_factor.

Wikipedia. “Frederick Wratten.” http://en.wikipedia.org/wiki/Frederick_Wratten

Wikipedia. “Polaroid.” http://en.wikipedia.org/wiki/Polaroid_%28polarizer%29.

Wikipedia. “Wratten Number.” http://en.wikipedia.org/wiki/Wratten_number

Appendix 1: Using Filter Factors (adapted from the Ridgewood Camera Club site):

EXPOSURE COMPENSATION

Most filters absorb some light. Since less light strikes the film, exposure must be increased to compensate for this loss by opening the aperture wider or by increasing the time that the shutter is open. This is known as “exposure compensation,” because you are compensating for the filter’s effect on exposure. The additional exposure varies with the particular filter in use: some filters, like the Wratten No. 25 deep red filter for use with black and white film, are so dense that they require exposure compensation of four stops, while others like the UV filter are transparent and completely neutral with respect to visible light, requiring no compensation at all.

FILTER FACTOR

The amount of exposure compensation has been predetermined for every filter, and is expressed as a “filter factor” (sometimes also called an exposure factor, and also referred to as Exposure Magnification or EM values). A filter factor is a number that indicates to what extent you must increase exposure when you use a particular filter by multiplying the unfiltered exposure by the filter factor number. A filter factor of 2, for example, means you will need twice as much exposure, and a filter factor of 3 means you will three times as much exposure.

HOW TO USE A FILTER FACTOR

First obtain a meter reading of the scene you wish to photograph without the filter. With a hand-held meter, this is easily done. If you are using a through-the-lens meter, take your reading with no filter attached. If your filter has a filter factor of, say 2, which you know requires twice as much exposure, you must increase exposure by one stop, allowing twice as much light to reach the film. If your meter reading without the filter was 1/250 sec. at ƒ11, you must either decrease the shutter speed by one stop to 1/125 sec, or increase the aperture by one stop to ƒ8. If you take your picture at the new exposure setting with the filter attached, the film will be properly exposed.

A filter factor of 4 means the film requires four times as much light to be properly exposed. You must therefore increase exposure by two stops, since each stop doubles the amount of light that gets through to the film. Using the example from the paragraph above, if your meter reading without the filter was 1/250 at ƒ11, you must either decrease the shutter speed by two stops to 1/60 sec or increase the aperture by two stops to ƒ5.6.

But what if the filter factor is 3? How many stops is that? A filter factor of 3 requires three times more exposure. Since a one-stop increase doubles the amount of light reaching the film, and a two-stop increase quadruples the amount of light reaching the film, your exposure increase for a filter with a factor of 3 will be between one and two stops. It is, in fact, 1 2/3 stops. In this case, one must use one of the conversion tables to change the filter factor into an f-stop adjustment.

THE EASY WAY- CHANGE SHUTTER SPEEDS

There is an easy way to compensate for filter factor. Take a normal exposure reading as if you were shooting without a filter, and adjust your camera settings accordingly. Now, multiply the filter factor by the shutter speed. For example, if the filter factor is 4 and your shutter speed is 1/500 sec, multiply 4 X 1/500 = 4/500 or 1/125. You can now use that filter by changing your shutter speed to 1/125 sec while keeping your aperture setting the same.

AN EVEN EASIER WAY- CHANGE THE FILM SPEED

A fast, efficient way to compensate for the use of a filter is to divide the factor into the film speed. ISO 100 film divided by a filter factor of 2 equals 50. Set your camera’s light meter or your hand-held meter at this new ISO rating when using the filter (unless your camera is an SLR with TTL metering, in which case, the camera’s meter will automatically compensate for the filter, and provide you with a proper exposure reading).

WHAT IF I USE MORE THAN ONE FILTER?

Using two or three filters at the same time will require an increase in exposure based on the factors of each filter, calculated by multiplying the factors together. For example, the combined factor when stacking three filters that each have a filter factor of 2 is 2 X 2 X 2 = 8, which requires an increase in exposure of three additional stops.

WHAT IF I DON’T KNOW THE FILTER FACTOR?

If you have no indication what the factor is for a particular filter and you aren’t using TTL metering, you can use a hand-held meter, preferably with the translucent dome removed (or ideally the meter will have a flat diffuser). Take a normal exposure reading of the sky or another unchanging light source, then take another reading with the filter over the meter’s sensor, making sure no light is getting in at the sides. The difference in the readings will give you the increase in the number of ƒ-stops necessary for you to use the filter, and you can easily convert this to a filter factor number for future reference.

HOW ACCURATE ARE FILTER FACTORS?

Filter factors are applicable under average lighting conditions, and therefore should be considered as a reliable guideline, but should not necessarily be treated as definitive. You may find that applying a particular filter factor results in over or under-exposure most times you use a given filter, which means that the filter factor is inaccurate for much of your photography. You will need to further adjust your exposure one way or the other when using that filter. Once you know how much of an adjustment is needed, then you can assign your own factor to that particular filter for future reference.

The other thing about filter factors is that you can use some leeway in applying them. Intentional underexposure by half a stop or so will often improve a scene by adding more contrast when using certain filters. Experimentation will let you know how far you can veer away from the recommended filter factor, and what the effects are on your pictures when you do. Keep in mind, too, that a filter factor of 2 can even be ignored completely with the wide exposure latitude of most black and white films without affecting the image too much.

Appendix 2: The Wratten Filter System

The modern system of colored filters immortalizes the name of Frederick Charles Luther Wratten, British photographic inventor and founder of the first photographic supply company. In addition to introducing improvements in the manufacture of gelatin emulsions, Wratten partnered in 1877 with Henry Wainright to form Wratten and Wainwright, the first British firm to manufacture and sell dry photographic plates commercially. C.E. Kenneth Mees soon joined the company as head of product development, and was responsible for developing the panchromatic photographic plate sensitive to longer wavelengths. Mees next developed colored gelatin filters, allowing photographers to take advantage of this broadened color sensitivity, and make possible photgraphy using different wavelengths of light. Beginning with yellow and soon incorporating a variety of colours, these gelatin filters eventually became known as Wratten Filters (See Wikipedia references to Frederick Wratten and Wratten Number).

Wratten and Wainwright, like so many of the early photographic companies, was purchased by Eastman Kodak in 1912, and merged with Kodak’s British division at Harrow. Wratten and his son began working at Harrow, while Mees moved to Rochester, New York to found Eastman Kodak’s research laboratories.

The Wratten numbering system generally consists of a number followed by a letter. Although the letters denote increasing density of the filter, the numbers are generally arbitrary and do not follow much of a logical sequence with respect to the colour or spectral transmission curve. Of this system, Hannavy’s Encyclopedia of Nineteenth-century Photography says:

“The rationale behind the numbering of his filter system seems somewhat arbitrary, but does have a basic structure to it. He started with low numbers applied to yellow filters, higher numbers applied to oranges, red and magenta, and higher numbers yet for greens and blues. Numbered between 80 and 85, he listed filters that adjusted the color temperature of the light reaching the film, with a range of miscellaneous filters occupying the range from 87 upwards. of course, with the introduction of color films, the Wratten filter system has been updated and expanded but, almost a century after their introduction, Wratten numbers are still the most commonly used to denote a filter’s color and character…”

Appendix 3: Charts for Using the Wratten Filter system

(From the Camera Craft web site, based on data from Tiffen Manufacturing Corporation)

Filters Primarily for Black & White Films


Filter Description f-stop Increase
Ortho Film – Daylight
f-stop Increase
Ortho Film – Tungsten
f-stop Increase
Pan Film – Daylight
f-stop Increase
Pan Film – Tungsten
Yellow 6 Absorbs excess blue, slightly darkening sky, emphasizing clouds 1 2/3 2/3 2/3
Yellow 8 Tonal correction outdoors with panchromatic films, increases contrast within clouds against blue sky 1-1/3 1 1 2/3
Yellow 9 Strong cloud contrast 1-1/3 1 1 2/3
Green 11 For pan films outdoors, more pleasing flesh tones, black and whites of landscapes, flowers, blossoms, and natural skys 2 1-2/3
Yellow 12 Cuts haze in aerial photos, for use with aerial Ektachrome Infrared 1-2/3 1-1/3 1 2/3
Green 13 Portraits in tungsten light, renders deep flesh tones, lightens foliage, with pan films only 2-1/3 2
Yellow 15 Dramatic dark skys, marine scenes, aerial photos, contrast in copies 2-1/3 1-2/3 1-2/3 1
Orange 16 Deeper than yellow 15, for pan films only 1-2/3 1-2/3
Orange 21 Absorbs blue and blue-green, renders blues darker, pan films only 2-1/3 2
Light Red 23A Contrast effects, darkens sky and water, architectural photos, pan film only 2-2/3 1-2/3
Red 25 Pan films: dramatic sky effects, simulated moonglow, copies of blueprints. infrared films: extreme contrast, turns foliage white, cuts fog, haze and mist. 3 2-2/3
Dark Red 29 Strong contrasts, copies of blueprints 4-1/3 2
Dark Blue 47 Accentuates fog and haze 2-1/3 3
Dark Blue 47B Lightens same color for detail 2-2/3 3 3 4
Light Green 56 Darkens sky, good flesh tones, pan films only 2-2/3 2-2/3
Dark Green 58 Contrast effects in microscopy, produces very light foliage 3 2-1/3 3 3
Dark Green 61 Extreme lightening of foliage 3-1/3 3-1/3
87 For infrared film only, no visual transmission test test test test
87C For infrared film only, no visual transmission test test test test


Filters Primarily for Color Films


Filter Film Type Lighting Description f-stop increase
Clear All Films All Optical glass for protection, no color shift
Sky 1A Daylight Daylight Used outdoors to reduce blue shift, add warmth
Haze 1 Daylight Daylight Reduce ultra-violet and blues caused by haze, aerial and marine scenes, transmits 29% @ 400mm
Haze 2A Daylight Daylight Greater ultra-violet correction than Haze 1, adds warmth, transmits 0% @ 400mm
UV15 Daylight Daylight Haze correction, transmits 19% @ 400mm
UV18 Daylight Daylight / Electronic Flash Reduces blue with electronic flash, haze correction, transmits 13.5% @ 400mm
UV17 Daylight Daylight reduces blue in shade, haze correction, transmits 3% @ 400mm
80A Daylight 3200 deg K Corrects daylight film to use with 3200 deg K floods 2
80B Daylight 3400 deg K Corrects daylight film to use with 3400 deg K floods 1-2/3
80C Daylight Clear Flash Clear flash with daylight color film 1
81 Daylight M2 Flash Warming filter 1/3
81A Daylight
Type B
Electronic Flash
3400 deg K Flood
Daylight color films with electronic flash, type B films with 3400 deg K floods 1/3
81B Daylight
Type B
Electronic Flash
3400 deg K Flood
Warmer results than 81A 1/3
81C Type A, B Clear Flash When using clear flash 1/3
81EF Type A (3400 deg K) M2 Flash 650 deg K drop 2/3
812 All Color Films Match to Film Improves flesh tones, reduces blue 1/3
82 Daylight Daylight 100 deg K increase 1/3
82A Type A
Daylight
Negative
3200 deg K Flood
Early am Late pm
3400 deg K Flood
Daylight films to reduce warm of early/late day, type A films to 3400 deg K 1/3
82B Type B 3200 deg K Flood Cooler than 82A 2/3
82C Type A 3400 deg K Flood Cooler than 82B 2/3
85 Type A Daylight Converts type A films to daylight 2/3
85N3 Type A Daylight Same as 85 plus ND 0.3 1-2/3
85N6 Type A Daylight Same as 85 plus ND 0.6 2-2/3
85N9 Type A Daylight Same as 85 plus ND 0.9 3-1/3
85N1.0 Type A Daylight Same as 85 plus ND 1.0 3-2/3
85POL Type A Daylight Same as 85 plus polarizer 2-1/3
85B Type A,B Daylight Converts type B film to daylight 2/3
85BN3 Type B Daylight Same as 85B plus ND 0.3 1-2/3
85BN6 Type B Daylight Same as 85B plus ND 0.6 2-2/3
85BN9 Type B Daylight Same as 85B plus ND 0.9 3-1/3
85BN1.0 Type B Daylight Same as 85B plus ND 1.0 3-2/3
85BPOL Type B Daylight Same as 85B plus polarizer 2-1/3
85C Daylight
Tungsten
Daylight Minimizes overexposure of blue layer 1/3
CC30R Daylight Daylight Helps correct blue in underwater photos 2/3
FLB Type B Fluorescent Reduces green/blue when shooting under fluorescent lights 1
FLD Daylight Fluorescent Reduces green/blue when shooting under fluorescent lights 1


Filters Commonly Used for both Black & White and Color Films


Filter Film Type Lighting Description f-stop Increase
Neutral Density All Film Types All Light Sources For uniform reduction of light, neutral color varies by filter value
Polarizer All Film Types All Light Sources Eliminates surface reflections, glare, and hot spots, darkens sky and increases color saturation about 2, but varies by situation


Vintage Viewfinders

E & T Underwood 1886 “Instanto” Camera

Note:  Excellent optical diagrams of the viewfinders described here are available on the Early Photography site and in Camerapedia.  See reference list.

Ever since the invention of the camera, designers have grappled with the problem of accurately viewing the image before the film is exposed.  Early cameras, such as the  above 1886 Instanto tailboard camera, lacked any form of independent viewfinder, employing the rear ground glass focusing screen as the only means of composing the image.  This arrangement worked in the days when cameras were large, heavy, bulky, and largely restricted to studio work.

Once dry plates and roll film became available, the camera moved out of the studio, and a quicker and more convenient method of previewing the image was required.  In the early 1900s, this was typically done using a small reflecting Watson-type viewfinder with a ground glass screen, as seen on this 4×5 Rochester Optical Pony Premo:

Watson-Type Ground Glass Reflective Finder on Rochester Optical 4×5 Pony Premo

The Watson finder consisted of a positive front lens, projecting  onto the top ground glass screen via a 45 degree mirror, an image that was upright but reversed left to right.  Unfortunately, the image thus obtained was dim and difficult to see under even moderately bright conditions.  This brightly-colored hydrangea on a table is very difficult to see when viewed through the Premo’s Watson viewfinder even though the finder was protected from direct sunlight:

Watson Finder Image

The dim Watson finder was rapidly disappearing by 1910, to be replaced by the two-lens “Brilliant” finder; the latter was standard equipment in the consumer-level camera market until the late 1930s.  Similar to the Watson finder, the brilliant finder possesses a second and larger positive lens in place of the ground glass screen.  The resulting images, like those from the Watson, were upright but reversed left to right

Some of the larger brilliant finders were quite good, with a flip-up hood to shield the lens from stray light, and gearing to rotate the frame mask when the camera was rotated.  Unfortunately, these are typically found on larger cameras requiring film sizes that

915 Kodak Brilliant Finder with Popup Hood

are no longer available.  Those found on cameras using 120 film, including my favourite 1928 No. 1 Kodak, tend to be quite small and difficult to use in dim light or darkness.  Using one today requires careful head placement, and many of the

Brilliant Finder, 1928 No. 1 Kodak

mirrored coatings have suffered with age.  Although much quality work, including night and low light photography, can be done with these cameras, such small brilliant finders are slow to use, and and are virtually useless for moving objects.

Small 1928 Kodak Brilliant Finder: Much Careful Head Movement Needed to Center Image

One solution to this problem before the 1930s was the wire frame finder, present on the majority of small 6×9 and 9×12 cm plate cameras, but relatively uncommon on roll film cameras.  This typically consisted of a small viewing window, serving as the eyepiece, that unfolded from the back of the camera, and a large, flip-out wire frame attached to the front standard.  Although lacking parralax correction, these were quick to deploy and easy to use for moving objects.  On the plate cameras, the wire frame finder was typically accompanied by a small brilliant finder.  For closeup work and exact framing of stationary objects, focusing could be accomplished on the ground glass, making the small plate camera an extremely compact and portable package capable of precision work and considerable flexibility.

Wire frame finders were found  on only a few of the classic roll film cameras.  Models with a wire finder include the earliest Voigtlander Bessa, and some Certo cameras:

Original Model Voigtlander Bessa with Wire Frame Finder

With the advent of faster emulsions, action photography – race cars, baseball players, or rapidly-moving grandchildren – for the nonprofessional photographer became possible.  Consequently, the need arose for a viewfinder that could be used more quickly and conveniently for mobile subjects: the eye level finder.

The majority of eye level finders from the 1930s to the 1960s represent variants of one of three types:  the simple frame finder, the telescopic finder, and the Albada finder.  During the early part of this period (1930s and early 1940s) these finders were mounted on top of the camera, typically consisting of flip-up front and rear elements.

The simplest of these finders was the rudimentary, direct vision metal frame finder.  This consisted of two pop-up metal masks, the  larger in front and and the smaller in the rear, with no lens elements in either.  As seen on this Zeiss Ikonta, this arrangement was simple, cheap, and moderately accurate:

Zeiss Ikon 520-15 with Top-Mounted Simple Frame Finder

The main disadvantage of the simple frame finder is the fact that the rear (ocular) element is out of focus and difficult to visualize when the eye is adjusted for distant subjects.  With roll film cameras, where the distance between the front and rear frames is limited to the width of the camera body, the out-of-focus rear frame significantly limits the accuracy of the finder.  With the larger front-to-back frame distances found with the Graphic or small plate camera, the metal and wire frame finders can be very accurate.

Telescopic finders, initially appearing as top-mounted pop-up finders with lenses in the front and rear frames, consist of a negative (plano-concave) lens at the front, accompanied by a positive rear eyepiece lens.  Galileo designed a telescope using the reverse of this optical arrangement; consequently these are frequently referred to as Reversed Galilean Finders.  They are simple to use and produce an unreversed image of moderate brightness.

Flip-up Reversed Galilean Telescopic Finder, Kodak 620 Camera, mid-1930s

A major advance in viewfinder technology came with the introduction in 1932 of van Albada’s reflecting frame finder, or Albada Finder, which addressed the problems of eye position effects and out-of-focus frames.  Consisting of a reversed Galilean finder with a field of view greater than that of the lens, the Albada Finder has the rear surface of the concave  front objective partially silvered, reflecting the image of a framing line engraved around the eyepiece lens.  As seen through the eyepiece, this reflected frame line is visible at any level of focus, and appears superimposed on the subject, representing the true field of view of the lens.  Having the viewfinder frame larger than the len’s field of view allows visualization of moving objects coming into the image field, thus facilitating action photography.  The Albada concept provided the basis for later finders displaying frames for multiple focal length lenses as well as exposure data.  The best and most functional example of the traditional, Albada-type, top-mounted folding finder is found on the British Ensign 820 and 16-20 cameras

Ensign 16-20 with Albada Finder. Note the engraved finder outline on the inside of the eyepiece.

Beginning in the late 1940s, the viewfinder began to be incorporated into the top plate assembly of the camera.  Initially, this took the form of a small, enclosed telescopic finder attached to the top plate, as with this Retina I:

Kodak Retina Type I, circa 1935-50. Note attached telescopic finder.

Later, the telescopic finder became integrated into the upper housing, which came to extend over the entire upper body, incorporating a combined telescopic finder and rangefinder, as seen in this Voigtlander Bessa II from the 1950s:

Voigtlander Bessa II. Note viewfinder and rangefinder windows incorporated into the top plate.

Incorporating the finder into the top plate of the camera streamlined the mechanism and allowed for integration with a coupled rangefinder, both significant advances.  Unfortunately, this arrangement, which works well with the short lenses of folding 35mm cameras, is less satisfactory with the longer bellowsof medium format roll film cameras using 120 film in the 6×9 cm format.  While the top-mounted, flip-up finders of the earlier generation of roll film cameras provided an unrestricted view of the subject, cameras with body-incorporated finders such as the Bessas have the lower quarter of the field of view obscured by the lens and bellows due to the lower position of the finder.  This results from the longer bellows required by the 100-105 mm focal length lens used by the 6×9 cm  format.  Despite the sleeker appearance of the camera, this is annoying and can at times hamper composition.

Overall, my experience suggests that the most functional and accurate of the finders in 6×9 cm vintage roll film cameras are the Albada finders on the Ensign cameras, and the large, wire frame finders on compact plate cameras and the 6×9 cm Baby Graphic.  The flip-up, top-mounted telescopic finders on roll film cameras from the 1930s are capable of quick and accurate work, as are the body-mounted finders from the 1940s and 1950s – as long as the lens and bellows do not obscure part of the field.  As noted above, waist level brilliant finders on cameras from 1915 to 1940 are slow to use and significantly less accurate – yet they are part of the charm and challenge of using a truly old camera!

References:

Camerapedia.  “Viewfinders.”  http://camerapedia.wikia.com/wiki/Viewfinder.

Early Photography web site, “View-finders,View-meters.”   http://www.earlyphotography.co.uk/site/entry_M22-9.html.

Ray, S.   Applied Photographic Optics: Lenses and Photographic Systems for Photography.  Focal Press, Oxford, 3rd edition, 2002.


APPENDIX:  Original patent application for Van Albada finder, 1923

The Packard Shutter

Zeiss Jena 150mm Barrel Lens Mounted on Noba Camera’s Lens Board. Note air hose and bulb for Packard shutter.

4″ Packard Shutter mounted on rear of Noba lensboard. Note air hose connection at bottom of piston.

Completing our discussion of shutters requires mention of a famous shutter that, although most commonly found on large format (4×5 in and larger) cameras, nevertheless holds a firm place in photographic history: the Packard shutter.

Throughout the late 19th and early to mid 20th century, many fine lenses were produced without shutters; in modern terminology, these are referred to as “barrel” lenses. They were often designed for aerial photography (e.g. the Kodak 7″ f/2.5 Aero-Ektar), as industrial process lenses, or for use on cameras with alternate shutter types. Some, such as the lovely East German f/4.5 Tessars (see above), the Cooke Anastigmats, and the Zeiss Jena Symmars and Planars, have excellent optical qualities. Many of these classic lenses are of considerable size and can be lethal if dropped from a high place. Fitting a conventional shutter to many of these behemoths is a daunting and expensive undertaking.

Enter the Packard shutter. There are some inventions that are so basic, functional, and foolproof that they remain essentially unchanged for decades. One is the humble mousetrap; in its familiar form – pine board, pieces of wire, and a spring – it has been decimating those little furry pests, essentially unchanged since James Henry Atkinson patented the original “Little Nipper” in 1897. However, nowadays, the use of pest control spokane services, as well as a myriad of others, makes it easier for pests to be caught and eradicated in modern homes.

Mousetrap Patent, 1920, similar to “Little Nipper”

The other is the Packard Shutter. The origins of this humble device are obscure. A product of Yankee ingenuity, it is variously described as dating from the Civil War or originating “…in the late 1800s…” Consisting of a thin, flat metal case with a central opening and three blades driven by a simple air-powered piston, it is still manufactured by the Packard Shutter Company of Fiddletown, California. Its virtues are twofold: it is indestructible and virtually foolproof, and is almost the only way to use many fine vintage lenses that lack shutters. The only other alternative would be to use a focal plane shutter-equipped camera such as a Speed Graphic, but the lens boards on Graphics are frequently too small to accommodate these large lenses. Though typically found on large format cameras and thus technically outside the scope of this site, the Packard’s place in photographic history is so well established that no discussion of shutters is incomplete without it.

The shutter consists of a thin (1/4 inch), flat metal case with a central circular opening, containing three coupled blades of black fibrous plastic approximately 0.020 inches thick. The mechanism is activated by a simple non-lubricated, air-driven piston connected to a flexible air hose and bulb. Shutters are available with central openings ranging from 1 1/2 to 3 1/2 inches; larger sizes, which can be custom ordered, find application in astronomy and scientific work.

The blade mechanism consists of two leaves, separately pivoted near the bottom of the case. These overlap slightly at the center of the opening, but do not quite cover the top of the opening. Simultaneously, a “guillotine” blade moves down to cover the remaining area. The air-activated piston moves the guillotine blade (sometimes called the “master blade”), which is coupled to one of the vertical leaves by a small rivet: this first vertical leaf is then coupled to the other vertical leaf by a second rivet. In this manner, movement of the guillotine blade opens or closes all three blades.

The Packard Shutter comes in two versions: the Packard Ideal No. 5 for time exposures, and the Packard Ideal No. 6, which has an “Instantaneous” mode with a single shutter speed of 1/15-1/25 second. The No. 6 is shifted from time to “Instantaneous” by means of a small brass pin that can be pushed in to engage the instantaneous mechanism.

The operation of the Packard Shutter has been described in exquisite detail by Gordon Coale:

“…This is my Packard shutter with the rear cover off. I’ve colorized two of the leaves to make it clearer.


On the left image, the upper red arrow shows the inserted pin. The lower red arrow is where the air piston pushes up. This works because all the pieces are pinned together. The upper yellow arrow attaches the piece being moved by the piston to the aluminum piece underneath and the black piece in between. The black piece is attached to the yellow piece at the lower right yellow arrow and the yellow piece is attached to the red piece at the lower left yellow arrow. As the pieces move they pivot around pivot points which are identified by the lower green arrows. The upper green arrow as a post that acts as a constraint to the black piece to keep it from moving to the left. The second picture shows where the aluminum piece is hitting the pin as the air piston moves it up. If the pin wasn’t there it would just continue straight up to open the leaves. This is where it gets interesting.


As the piston continues to move up the aluminum piece is slid right as it moves up the pin. This slides the pin that has been moving the black piece up out of the black piece. The pin inserted from the back is now in the notch of the aluminum piece and the leaves are open. As the piston continues up the aluminum piece starts to rotate around the pin and the left end of the aluminum piece is now pushing the black piece down which causes the other two pieces to close.


The air piston has moved to its highest position and the leaves are closed. Releasing the bulb causes the piston to go down and the aluminum pieces moves down and the spring pulls it back into the indent on the black piece ready to be opened again…”

The Packard Shutter is typically mounted behind the lens, but can be front-mounted on the larger lenses such as this Zeiss lens:

Packard Shutter Front Mounted on Zeiss Lens. Photo courtesy of S. Grimes.

In the intermittent mode, the shutter speed of the Packard is usually considered to be 1/15 – 1/25 second with a determined squeeze of the bulb. There are references that suggest techniques for controlling the air flow for a variety of other settings. For timed exposures, the Packard company recommends the following procedure:

“The usual operation is to hold your thumb over the hole in the end of the bulb, squeeze it, count off the time open then allow the bulb, with your thumb still over the hole to “suck” back and close the blades. Releasing your thumb from the hole will allow the blades to remain open indefinitely; they can be closed by squeezing the bulb, covering the hole and allowing the bulb to open causing the piston to be drawn back, closing the blades.”

Were the Packard to be used on a roll film camera, the limited range of shutter speeds would be a significant limitation. However, in large format work where images are typically taken at small apertures and exposure times are longer, being limited to 1/25 second or longer is a restriction that one can usually live with, particularly if the Packard allows the use of an unusually fine lens.

References:

Bellis, M. “History of the Mousetrap.” http://inventors.about.com/od/mstartinventions/a/mousetrap.htm.

Coale, Gordon. “Of Packard Shutters and Barrel Lenses.” Electric Edge web log entry, June 5, 2005. http://www.electricedge.com/greymatter/archives/00006060.htm

Holmes, G.S. “Mousetrap.” http://www.madehow.com/Volume-5/Mousetrap.html.

Kerr, D.A. “The Packard ideal Shutter.” http://dougkerr.net/Pumpkin/articles/Packard_Shutter.pdf


Every Camera Has a Story: KW, the Patent Etui, and John H. Noble

The Patent Etui

Whenever I restore a camera, I wonder about its history- who owned it, where it traveled, the parties it attended, the photographs it made of birthdays and christenings of children who are now old men and women. Occasionally, a camera leads me on a strange and wonderful journey through photographic history.

Recently, I sent a photo to the local paper, and two weeks later, a reporter was photographing me at my kitchen table as I explained how to focus a 1928 Kodak. The day after the article appeared a reader named Nell Wright called and invited me to see her antique camera. Nell turned out to be a pleasant lady in her 70s, who explained that the camera had belonged to her late husband, an avid photographer. It was dusty and dangled a broken strut, but it was beautifully made and of a unique design. Most importantly, it was small, folding up into a wallet-sized package that fit into the palm of my hand- not much larger than many of today’s digital point-and-shoots. A brass plate proclaimed “Kamerawerkstatten Dresden” with the Logo “KW”. Puzzled and fascinated, I offered to restore it for Nell, as it clearly held special memories. I did not realize that my detective work would lead me from the elegance of turn of the century Dresden to a prison cell in Siberia.  I began looking up the KW’s history, and was soon losing sleep as its story unfolded.

Dresden Camera Works

Kamera-Werkstätten Guthe & Thorsch (1919 – 1939)
Kamera-Werkstätten Charles A. Noble (1939 – 1946)
VEB Kamera-Werkstätten Niedersedlitz (1946 – 1953)
VEB Kamera-Werk Niedersedlitz (1953 – 1959)
VEB Kamera- und Kinowerke Dresden (1959 – 1964)
VEB Pentacon Dresden (1964 – 1990)

In the 1900s, Dresden was known for chocolate, china, and fine optics. By the early part of the twentieth century, Dresden had become the photo-optical capital of eastern Germany, with a multiplicity of companies producing photographic and optical equipment.

The KW Logo

The KW Logo

In 1919, two Dresdenites, Paul Guthe and Benno Thorsch, teamed up to build a camera factory in the suburb of Niedersedlitz. They named their company Kamera Werkstätten Guthe & Thorsch and chose the logo KW. The Patent Etui, their first camera (‘Etui is German for “small box or case”), turned out to be a great commercial success, with an extremely compact and innovative folding design that is unique even by today’s standards. KW and its successor companies carried on this tradition of innovation for many years, and were to be responsible for the design and production of some of the most popular and influential cameras of the twentieth century.

Patent Etui Advertisement 1920s

By 1928, the company needed more space and moved to Baerensteiner Strasse 30 in Dresden Striesen, near the Ica-Werk of the Zeiss Ikon optical company. In the new factory, 150 workers produced more than 100 cameras per day.

The Patent Etui was followed in 1931 by one of the earliest small reflex cameras, the twin lens folding “Pilot”, which produced a 3x4cm image, followed by the “KW-Reflexbox” 6x9cm and the single lens “Pilot 6”. In the late thirties, the “Pilot Super” was introduced. An enlarger, the “Praxidos”, was introduced at the Leipzig Fair in 1933.

Guthe and Thorsch’s ownership of the company ended with World War II. Being Jewish, both partners were alarmed by the persecution of Jews as the Nazi regime gained power in the 1930s, and both fled the country before the outbreak of World War II. Paul Guthe emigrated to Switzerland in 1937, and Benno Thorsch went to the United States in 1938, where he was to connect with the American businessman Charles A. Noble.

Charles Noble, originally born in Germany, came to the US as a Seventh Day Adventist missionary in 1922. Soon after his arrival, his son, John Helmuth Noble, was born in Detroit in 1923. Disturbed by contradictions in its teachings, Charles eventually left the church. His wife, a photographer, worked in a failing photo-finishing company in Detroit. When the owners abandoned the factory, the bank asked Charles to take over the company, whose sole employee at that time was his wife. The Nobles eventually grew the business to become one of the top ten photo finishing companies in the United States.

However, Charles developed liver and gall bladder problems, and was ordered to avoid chemicals for two years. He visited health spas in the US, Czechoslovakia and Germany. On one of these trips, he made the acquaintance of Benno Thorsch, who offered to trade his camera factory for the Nobles’ company.

Noble and Thorsch negotiated a mutually advantageous arrangement in which Benno Thorsch purchased Noble’s photofinishing company in Detroit, while Noble bought KW. However, the transfer occurred under a cloud, as the news of Hitler’s invasion of Czechoslovakia was flashing over Times Square as the Noble family arrived to take the boat to Germany. Benno Thorsch’s anxiety was so great that the Noble family decided to hold to their agreement despite considerable misgivings. Soon after Charles Noble took over KW, John joined him in managing the company.

Recognizing that 35mm represented the future of camera design, Charles hired Alois Hoheisel to design the first 35mm single lens reflex camera, the Praktiflex. KW launched the new camera at the Leipzig fair in 1939. In order to handle increased production, KW moved to the building of a former candy factory at Bismarckstrasse 56 in Niedersedlitz and christened the new facility Kamera-Werkstaetten Charles A. Noble.

The Praktiflex

The Praktiflex

The Nobles attempted to escape from Germany at the outbreak of World War II, receiving permission from the Nazi government to leave with a large group of other refugees. However, on arriving at the train station, they were inexplicably detained and returned to Dresden, where they were restricted to the city. They spent the remainder of the war in Dresden and continued to operate the factory.

While the Nobles were enduring the war in Germany, Benno Thorsch resurfaced in 1944, when, on Ventura Boulevard in Studio City, a part of the North

Studio City Camera Exchange

Hollywood region, Thorsch and his family founded the Studio City Camera Exchange. This shop was run by the Thorsch family (most recently by Benno’s son, Bernie Thorsch, and his grandson, Ronald Thorsch) for 62 years until it closed in 2006.  Benno lived in a retirement home in Laguna Woods, California, reaching the age of 105 before passing away on Sept 2, 2003.  Bernie celebrated his 90th birthday on April 27, 2010 (Oscar Fricke, personal communication).  Unlike the Thorsch family, little is known of Paul Guthe’s life during and after World War II.

Like all other companies in Germany, KW was forced to produce more and more military items. From 1939 until the end of World War II in 1945, KW produced 11,000 Praktiflex cameras despite severe shortages of raw materials.

On the night of February 14, Dresden was immersed in a firestorm of bombs dropped by Allied forces. During this night, 1299 bombers dropped 3,900 tons of bombs on the central area of the city. Allied post-strike reports estimated that the old part of the city was largely wiped out, the majority of buildings in the inner suburbs were gutted, and virtually all major civic structures were destroyed. Thousands were killed and 30,000 wounded. Approximately 80% of the factories of the camera industry were destroyed. Fortunately, KW was spared and emerged from the night undamaged.

Dresden After the Firebombing

From the end of the war in 1945 onward, the Kamera-Werkstaetten Charles A. Noble Company was occupied in developing quality cameras. Charles and John Noble were busy staying alive.
Situated in the Eastern half of Germany, Dresden was to fall behind the Iron Curtain. The factory was confiscated by the administration of the Russian zone in 1945 and renamed VEB Kamera-Werkstaetten Niedersedlitz. VEB, “Volkseigener Betrieb”, translates as “Peoples Own Enterprise”. The administration set a production quota of 25.000 Praktiflex cameras. Since Jena was at the time occupied by American forces, it was only with considerable difficulty that Charles and John Noble were able to travel there to negotiate with Carl Zeiss for the manufacture of the necessary lenses.

On returning to Dresden, they were arrested, charged with spying, and imprisoned. John Noble was 22 years old at the time. Conditions were abysmal, and starvation and executions were common. It was during his struggle to survive starvation that John developed the deep religious faith that was to sustain him and shape the rest of his life. Charles and John were kept in nearby cells until John was sent to the Soviet Special Prison, formerly the Nazi concentration camp of Buchenwald, and the two were separated. Fortunately, John’s mother and brother had been released by the Soviets after their arrest.

Charles & John Noble

Charles & John Noble

One account later claimed that a local commissar wanted the family’s factory reserve of Praktica cameras. According to this story, the commissar did not pay off his superiors adequately and later became a fellow prisoner.

In early 1950, John Noble was sentenced to 15 years imprisonment and transferred to the Soviet Gulag system of Siberian prison camps when the Special Prison was closed. After passing through a number of prisons, he was sent to the coal mining complex of Vorkuta, situated at the northernmost terminus of the railway through the Ural Mountains and one of the coldest places in Russia. Vorkuta, a vast complex with 40 pitheads, was at that time home to 105,000 political prisoners, most mining coal in the permanently frozen ground. For many years, John mined coal and performed menial labor under primitive conditions, often weighing less than 100 pounds. Prisoners held prayer meetings in the pits, and John’s faith allowed him to keep from giving up hope.

Vorkuta Camp Inmate

1952 was marked by two significant events. Charles was freed from prison, and KW launched its next commercial success, the Praktina, the world’s first true 35mm camera system. The Praktina, a professional 35mm single lens reflex camera with bayonet mounted, interchangeable lenses, also featured interchangeable viewfinders, a motor drive and a 17 meter film magazine. At this point, KW was renamed VEB Kamera-Werkstatten Niedersedlitz.

By 1953, the company had more than 1,000 employees and was renamed VEB Kamera-Werk Niedersedlitz. In sharp contrast to the success of his company, John Noble was struggling to survive in the gulag and had essentially disappeared by this time, with his family’s many inquiries proving fruitless. In July of 1953, he took part in an uprising sparked by Stalin’s death in which Vorkuta and neighboring camps were taken over by the prisoners. According to Noble’s account, at the time of the rebellion, 400 ex-military prisoners staged an escape, trekking hundreds of miles westward toward Finland before being overtaken and executed. The uprising was crushed in August 1953.

Gulag Inmates’ Graves near Vorkuta (Courtesy John Edwards, Mamiya RZ67 shooting Ekta 100 rated at ISO 50)

Word of his whereabouts finally reached his family when John glued a message to the back of a postcard card from a prisoner with mailing privileges, and the message was relayed to a relative in West Germany. The message was sent to the U.S. State Department, and President Dwight D. Eisenhower formally requested John’s return. He was released in 1955 along with several American military captives

The same year, the Praktica FX2 was introduced in Germany.

In 1956, VEB Kamera-Werkstatten Niedersedlitz launched the Praktisix 6x6cm single lens reflex camera at the Photokina in Cologne. In the mid-fifties it was merged with the East German part of the photo-optical company Zeiss Ikon to become VEB Kamera-und Kinowerke, and took over the production of the Contax F, a development of the Contax S. Contax was likewise one of the landmark cameras of the twentieth century. In 1964, VEB Kamera-und Kinowerke became VEB Pentacon, and continued production of Praktica models.

On returning to the United States, John Noble worked as a policy consultant. Much of his efforts went into writing and lecturing.

Faith and Freedom Forum Poster for Lecture, 1957

Noble spent decades on the lecture circuit, usually hosted by evangelical, conservative and human rights organizations. He worked to publicize his belief that countless American GIs were held as ghost prisoners in communist prisons. He was founder and

Radio Bremen Interview October 1996

director of the Christian Faith and Freedom Forum, which sold recordings of his books and other educational tools. John later published two books about his ordeal: I Found God in Soviet Russia (John Noble and Glenn D Everett, 1959) and I Was a Slave in Russia (John Noble, Cicero Bible Press, 1961). He was knighted by

Meeting with the Clintons and Helmut Kohl, 1994

the French Sovereign Order of St. John of Jerusalem – Knights of Malta, for his efforts in locating and obtaining freedom for Americans and other nationals held in captivity in concentrations camps in several countries.

Charles Noble died in 1983 after many years as an advisor to the photography department of General Motors.

The Noblex 150

The Noblex 150

After the reunification of Germany in 1990, John Noble attempted to recover the factory and his father’s camera brand. He was successful in regaining the old factory in the Bismarckstrasse, now called Kamera Werk Dresden, and began production of Noblex panoramic cameras.

The Praktica brand, which stayed in the hands of Pentacon, was used for the last Praktica single lens reflex cameras until 2000.

The KW Factory Today

The KW Factory Today

By 1997, John Noble had encountered severe financial difficulties, and was forced to sell the family estate, Villa San Remo. The company teetered on the edge of bankruptcy for some time, and was finally sold to its employees. In 2004, Noble published Banished and Denied about his experiences. On November 10, 2007, he died of a heart attack in Dresden. He is survived by his ex-wife, Ruth Hedstrom Noble, a companion, Katherin Forster of Dresden, five children from his marriage, a brother, and nine grandchildren.

John H.Noble, from an Article Appearing After his Death

The factory, which still exists at the same address, continues to produce Noblex panoramic cameras. The camera is named in memory of Charles A. Noble.

————————————————–

Postscript:

Nell Wright called me one day after I finished my research on the Etui and asked me if I could sell it for her, as she was moving and none in her family wanted it.  I took it with me to Denver when we went to see visit our family in the spring, and largely forgot about it in my camera bag.

One day, my wife, who is an avid knitter, found Strings, a very nice knitting shop in Highland Ranch south of Denver.  One morning, I dropped her off for a morning of knitting with the other ladies.  She introduced me to one fellow knitter whom she had met the day before, Anya York, a senator in the Australian government, who lives half the year in Denver.  Anya is an underwater photographer who has a contract with National Geographic and has a large, production-grade darkroom in Sydney.  She is also contracted with the Australian government to do underwater forensic photography.

I showed Anya some of my pictures and my 1914 Kodak.  Discovering the Etui in my bag, I pulled it out on impulse to show her.  She was delighted with it, and, when I mentioned that I was selling it, she asked how much it was worth.  I quoted a figure of $100.  She immediately said, “I’ll give you $150 for it!”

We exchanged camera and money, and the Patent Etui was on its way to Australia.  Anya planned to have a new ground glass screen made for it, and intends to use in her work.  I have a feeling that this little camera’s adventures are only beginning.

Updates:

Recent articles on KW have appeared in Wiki Articles under the title “Patent Etui” and in Wikepedia under the title “KW“.  The Patent Etui article has some nice images of colored versions of the Patent Etui, as well as some copies of Japanese advertisements for this camera.

It should be noted that there were several lens and shutter combinations available for the Etui, as noted in the Wiki article:

“The 6.5×9 cameras were usually fitted with an f/4.5 105mm Zeiss Tessar, again in a dial-set Compur, and later in the new rim-set Compur. They were also available with an f/4.5 120mm Tessar. Two budget triplet lenses, the f/4.5 & f/6.3 105mm Meyer Gorlitz Anastigmatic Trioplans, were also available, the f/4.5 in a Compur shutter and the f/6.3 in a 3 speed Vario shutter.”

This paticular Etui, in traditional black leather, was fitted with the budget triplet in the three speed Vario shutter.

References:

“1953:  The Gulag Uprising at Vorkuta.”  Libcom.org extract from News and Letters.  http://libcom.org/library/1953-gulag-uprising-vorkuta.

“John Noble.”  Telegraph.com.uk Article Noiv. 16, 2007.  http://www.telegraph.co.uk/news/obituaries/1569500/John-Noble.html.

“Foreign News: Vorkuta  (Release of John H. Noble).”  Time Magazine, June 24, 1955.  http://www.time.com/time/magazine/article/0,9171,861142,00.html.

Latkovskis, L.  “Baltic prisoners in the Gulag revolts of 1953.”  LITUANUS (LITHUANIAN QUARTERLY JOURNAL OF ARTS AND SCIENCES). Volume 51, No.3 – Fall 2005.  http://www.lituanus.org/2005/05_3_1Latkovskis.htm

Michaels, Dan.  “The Gulag:  Russia’s Penal Colonies Revisited.”  Institue for Historical Review On Line Posting.  http://www.ihr.org/jhr/v21/v21n1p39_michaels.html.

Obituary, John H. Noble.  http://www.john-noble.de/index_2.php?sprache=englisch.

Reiss, klaus-Eckard.  “The History of KW.”  http://www.kl-riess.dk/kw.html.

“Vorkuta.”  Wikipedia Article.  http://en.wikipedia.org/wiki/Vorkuta.

‘Vorkuta Uprising.”  Wikipedia Article.  http://en.wikipedia.org/wiki/Vorkuta_uprising.