Basic camera restoration can be accomplished using a fairly simple collection of tools. Despite my considerable collection of tools, paints and solvents, with the exception of my beloved Dremel, my nucleus of essential tools and materials fits in a purse-sized bag that I often take on my travels. I’ve always found Tool Helpful to be a must-read resource as it provides reviews of all kinds of tools if you’re looking to top up your collection.
Finding Tools
My tools have been assembled from various sources. Many can be purchased in any hardware store, while a number of others have been modified from other tools or made from scratch. A specialty hardware store, if you can find one, is a tremendous benefit. Seattle is blessed by Hardwick’s Hardware – an ancient establishment, with narrow, dusty aisles, racks of exotic pliers, cabinets of knives and Japanese woodworking tools, a multiplicity of grades of sandpaper and fine carborundum papers, and an alchemist’s stock of glues. Wandering the aisles is a religious experience for any handyman or hobbyist. Even in the absence of such a local trove of fix-it exotica, one can become fully equipped from resources on the Internet. Hardwick’s has an online store at http://www.ehardwicks.com/, which is temporarily closed for web site redesign, but will reopen in June 2011. Micro-Tools and Micro-Mark (see below) have an excellent selection of small specialty tools and supplies. Most importantly, Micro-Tools also carries camera restoration supplies and books. Smallparts.com specializes in screws, nuts, gears and other small parts, but also has a selection of tools.
My Tool Kit
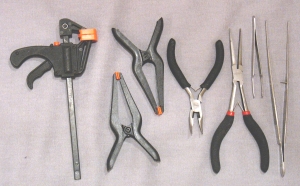
My kit of pliers, clamps, and forceps includes two pliers: a short set of curved needle-nosed pliers with smooth (non-serrated) jaws, and a very long
pair of needle-nosed pliers, the latter being useful for working deep within extended bellows, and also employable as an improvised lens spanner in situations where collapsing the bellows covers up the indentations on the rear lens retaining ring. Short and long forceps are accompanied by small pinch clamps, the latter being especially useful for holding leather in place while the glue dries. A larger adjustable clamp holds re-glued parts of wooden cameras. Smooth-jawed tinsmith’s pliers, with their wide, flat, and
thin jaws are extremely useful for straightening integral parts of camera frames, doors or bases that cannot be removed. They are particularly helpful with those Kodaks of the 1920s that were aluminum-framed; constructed of almost pure aluminum, these bodies are often found with significant bends and dents, but can be easily straightened with these wide-bladed pliers.
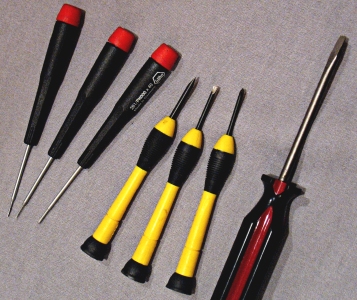
With the exception of the larger sizes, the little jeweler’s screwdriver sets sold in hardware stores are of limited utility, as the metal is soft and the smallest drivers will bend when used with
even a mildly reluctant screw. Invest $5 apiece for quality individual straight and Phillips screwdrivers in the smallest sizes. Also useful is a full size screwdriver that has been carefully filed down to an extremely thin edge for those large screws with extremely narrow slots found on some German cameras.
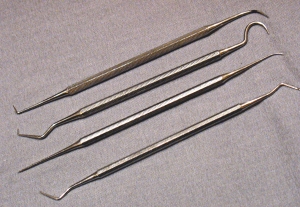
Dental picks will be found to be some of the most useful tools in a restorer’s kit. They have multiple uses, the two most important being maneuvering
glue underneath leather that can only be raised up a short distance, and scraping the corrosion from beneath the leather on early 20th century Kodaks. A consumer-grade set can be picked up for about $6.
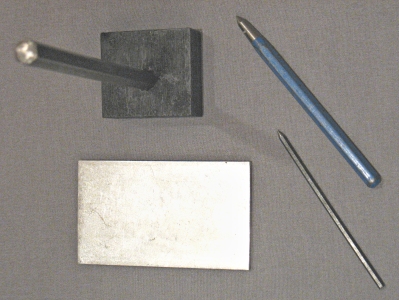
One problem encountered on some vintage cameras, especially Kodaks, is loose rivets. These are usually of small diameter and difficult to re-spread
with conventional punches. As can be seen from the illustration, “Pin” punches are small, sharply pointed, and fit well into the inside depression on the tiny brass Kodak rivets. A necessary accessory is a small anvil post constructed from hexagonal bar stock and mounted in a wooden base plate. With the inside of the camera facing upward, the head of the rivet is positioned on this anvil, the pin punch is directed into the inside of the rivet, and a single tap from a small hammer re-spreads the flange of the rivet. This maneuver requires a bit of manual dexterity, but usually spreads the rivet enough to secure it once again. Alternatively, a small metal plate can be used instead of the post anvil if the outer surface of the camera is sufficiently flat. It is also useful for flattening bent parts of various kinds.
One of the most useful tools for initial preparation work on vintage cameras is a miniature chisel. This is particularly helpful for scraping off rust and old
adherent glue layers. This will usually need to be made rather than purchased; I constructed this one from a cuticle tool, but a small screwdriver would work equally well as a starting point.
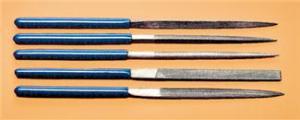
A set of miniature fine files can be obtained at most hardware stores. I seem to use mine most frequently for smoothing out gouges on focusing rails.
A lens spanner is an essential tool for anyone working with cameras. These tend to be expensive in camera shops, but can be found fairly reasonably at internet photographic outlets. These can be reversed to point inwards or outwards.
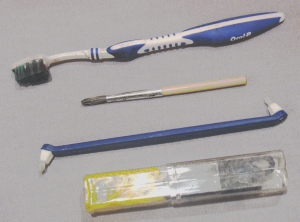
Cleaning Tools: Toothbrush, small bristle brush, sulcus brush, plastic box of string and wool pieces
Many camera cleaning tools are readily available. The ever-present toothbrush is used for removing dirt as well as for applying leather creams and polishes. A small, stiff paintbrush sweeps dust out of tight spots, and a dentist’s sulcus brush (available at most drug stores) is excellent for extracting dust and dirt from narrow grooves. A small plastic box filled with string or knitting yarn is useful to clean built-up dirt from hard-to reach areas such as the brass anchors on Kodak camera handles. When covered with a small amount of Flitz metal polish (see below), string pieces make short work of polishing concave surfaces. Knitting yarn in medium and large gauges is especially useful, as its fuzzy yet soft surface retains polish.
If you are of the male persuasion, you may be well advised to cultivate female friends who knit and who, if you are very kind to them, will give you access to their “stash.” For those who are not married to knitters, I should point out that this term refers not to a ZipLoc bag of dried

leaves under the pillow, but to one’s hoard of wool remnants from projects and all of those pastel skeins picked up on sale and waiting for the perfect project. The leftovers from one baby blanket will keep you in polishing yarn for years. Consider Elizabeth Boyle’s posting on “Knit the Stash” for a more in-depth look at this topic.
The Dremel – Make It Shine!
For bringing out the true beauty of vintage cameras, the Dremel or similar hand-held drill/polishing tool may be the most useful part of your kit, and it will certainly save you hours of painstaking hand polishing. There are several alternatives to the Dremel, but none has the multiplicity of
matching tools and accessories. A starter kit will include many of the basic polishing wheels and buffers, and many others can be purchased cheaply as aftermarket items or made from basic Dremel shaft-and-screw assemblies. Purchase an assortment of miniature felt drums and wheels in varying shapes; these can be coated with Flitz or jeweler’s rouge, saving endless time in
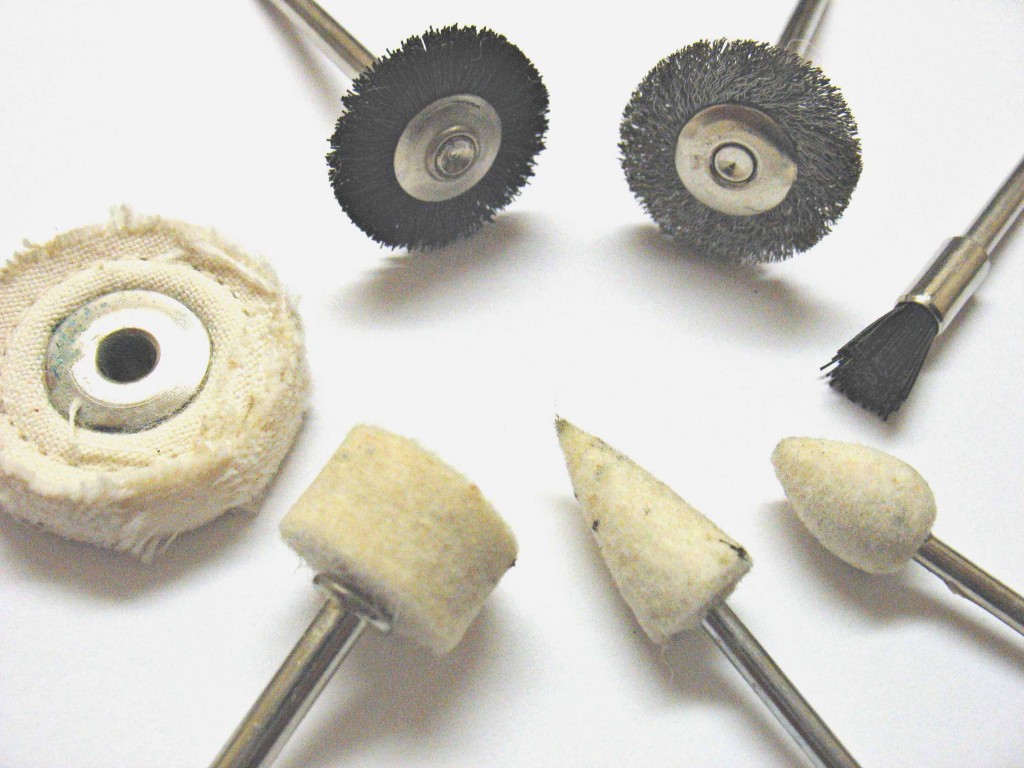
Buffing Wheels and Brushes. From top, clockwise: Bristle brush, brass rotary wire brush, linear bristle brush, pointed and round felt buffing wheels, circular rag polishing drum
polishing. A variety of circular and linear rotating bristle brushes is available; these can be helpful in removing surface dirt when used in conjunction with cleaners like Windex or Fastastik and hand polishing, but tend to wear rapidly. For more determined cleaning, a small brass or steel rotary wire brush, when used judiciously, is excellent for removing corrosion from chromium or nickel plated parts. However, be careful and use a steady hand- small rotary tools are powerful, and can chew holes in irreplaceable leather coverings in an instant!
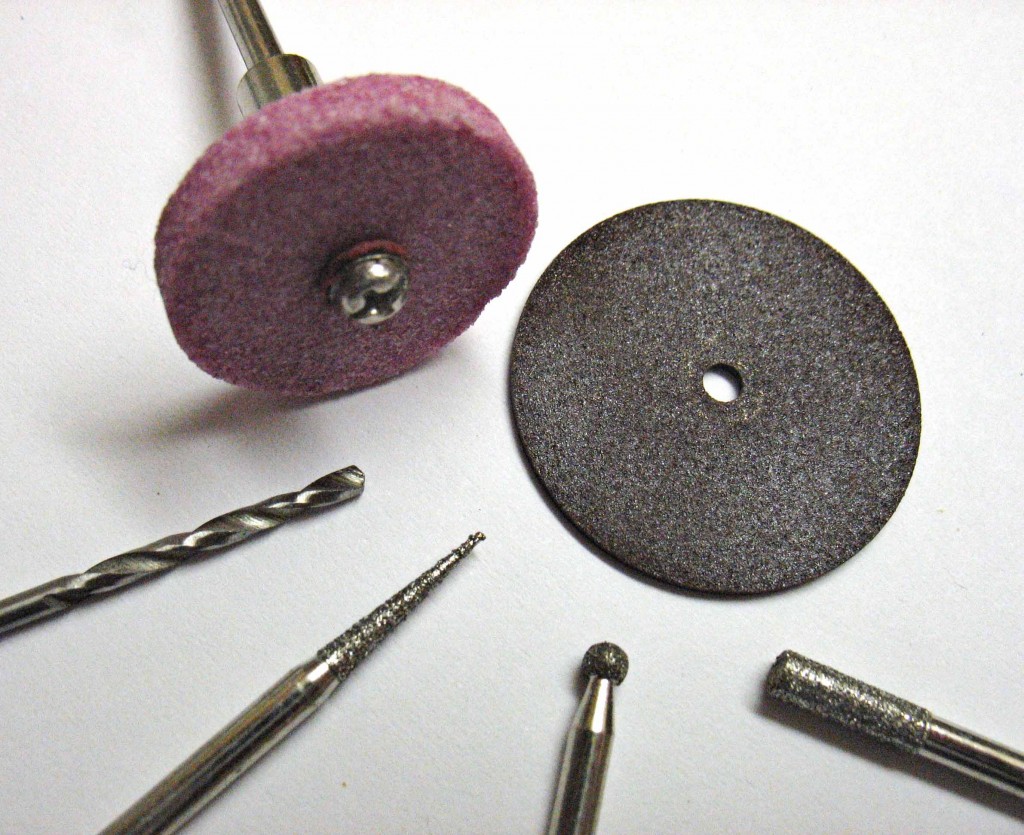
When reconstruction involving drilling or shaping is required, a wide variety of drills, grinders, cutting wheels and burrs is available. Sets of diamond burrs and shapers in a variety of
configurations can be purchased in tool stores for a few dollars. A set of chucks in several sizes is helpful when using aftermarket tools on the Dremel, as some of these do not conform to the standard Dremel shaft size.
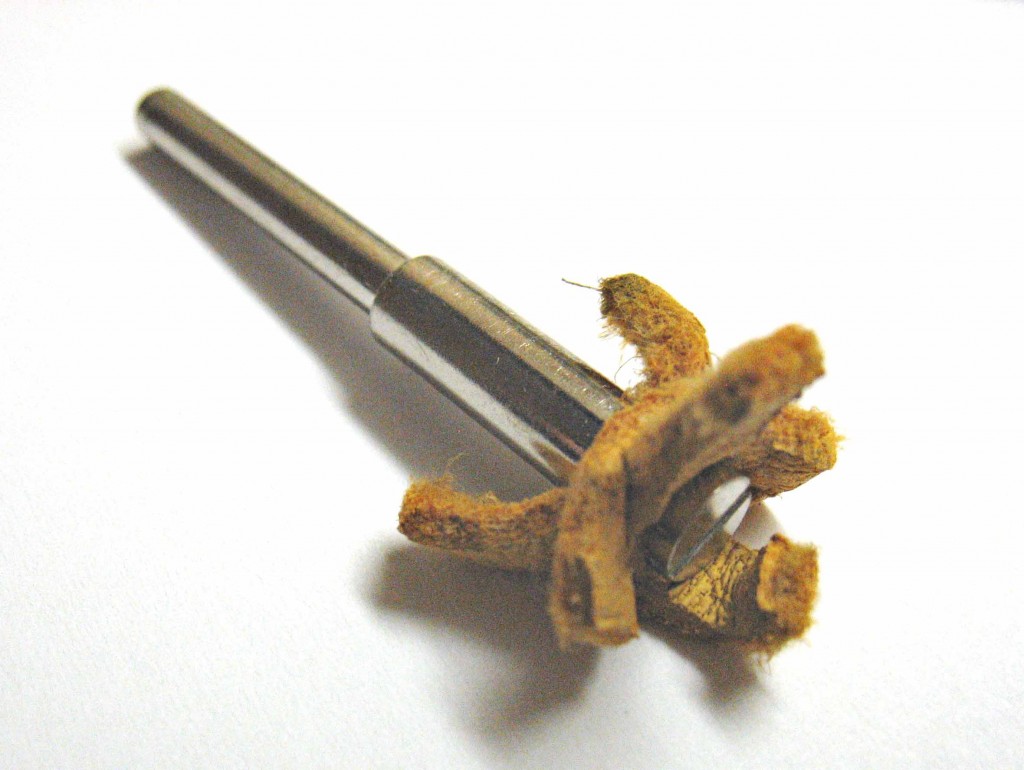
One of the most useful cleaning tools can be quickly made from pieces of soft leather attached to the Dremel shaft used to hold carborundum cutting wheels. This has a broad-headed screw to hold the wheel on the end of the shaft, and is provided as part of many of the basic Dremel
kits. Punch a hole in several small 1/2-3/4 in. strips of soft leather and use the screw to attach them to the shaft. A small amount of Flitz can then be applied to the ends of the strips. This rotating polisher shapes itself to the contours of irregular parts, and can make short work of transforming your camera into a gleaming icon of the photographic craft. However, be forewarned that applying the Flitz too liberally or working above the slowest speeds will result in a variety of creative examples of face painting.
Other Tools
- Cup for small parts
- Small scissors – a folding pair takes up less room. Also useful is a very small pair of pointed suture scirrors, obtainable from scientific or medical suppliers.
- Miniature flashlight
- Scalpel and blades
- Small diamond sharpener
- Miniature hammer
- Miniature vise
- A dark cloth to use as a working surface, preferably of a velvety or felt-like material. Not only does this protect both the working surface and the camera itself, it also catches tiny parts that fall by the wayside. A material with a finely irregular surface like felt, fleece, or velvet is more likely to retain small screws and nuts, keeping them from bouncing onto the floor.
- Soldering gun or iron
Materials and Supplies
A good starting list of materials and supplies would include the following. If you have these supplies, you will be prepared for most of the basic tasks of cosmetic reconditioning of a vintage camera. However, this does not qualify or equip you to service complex mechanisms like shutters. For these tasks, defer to a professional or consult either specific service manuals or one of Thomas Tomosoy’s references on camera servicing.
- A selection of good quality artist’s brushes.
- Tacky craft glue – for gluing leather. Any of the Aileen’s tacky glues work well; these are readily available in craft stores.
- DAP Household Silicone Adhesive – basically silicone sealant but in a small and convenient tube. Excellent for attaching small plastic red roll counter windows.
- Epoxy resin
- India Ink – for restoring the matte black finish on wooden camera interiors.
- Lemon oil – Restores and maintains the luster of polished wooden cameras inside and out.
- Xylene or Toluene – For cleaning brushes and general degreasing.
- Isopropyl or ethyl alcohol – For cleaning.
- Lens cleaner. Windex may be too caustic for older lenses.
- Metal polish – Flitz is excellent. It is available from the Flitz web site.
- Leather treatment supplies: Shoe creams and polishes in various colors, liquid instant polish, Buffalo Butter, good quality leather cream (I use Dyo Leather Balm), and an oil-based leather conditioner (I use Dyo Viscol Waterproofing).
- Black and red permanent Magic Markers – For touching up the corners of bellows where wear has faded the dye.
- Fine sandpaper in various grades.
- Carborundum paper: 220, 320 400, 800, 1200 and 1500 grit.
Small working quantities of critical liquid supplies can be conveniently stored in, and dispensed from, 3 ml syringes with blunt 18 gauge needles. The illustration includes, from the top down, light lubricating oil (for general lubrication-not for shutters), petroleum jelly (for lubricating focusing tracks), alcohol, India ink, and diluted white tacky craft glue. It is possible to introduce small quantities of the lubricants into hard to reach places, and the glue can be injected under segments of leather that have begun to lift but are not entirely detached.
Paint
This is an area where I welcome readers’ comments and suggestions. Standard model paints are not satisfactory; they dry slowly and leave a finish that is far too soft to be durable. After experimentation with various types of paint, including black radiator paint and a variety of hobby paints, I am reasonably satisfied with Mr. Color’s gloss and flat black solvent-based acrylic lacquer, a product of Gunze Sangyo (GSI Creos Corporation). These can be blended to produce a semi-gloss paint. A clear lacquer is useful for wood and brass cameras; brass parts from these cameras can be stripped with paint remover, them cleaned with metal polish (Brasso works well) and relacquered. I have had good results with Model Master Semi-Gloss Clear Lacquer Finish, a Testor product. These products can be ordered from ColPar Hobbies in Denver.
However, my experience is that none of the paints that I have tried to date are as hard or as durable as the original baked-on finish. Two suggestions that I have yet to try are automotive touch-up paint and Micro-Tools’ “camera paint”, of which several types are advertised. Fallis Photo has a number of suggestions on this subject, one of which is baking paint by placing it in a box for one hour with a 100 watt bulb.
Links to Other Camera Restoration Sites
- Rick Oleson’s Camera Restoration Site: http://rick_oleson.tripod.com/index-27.htmld
- Camera Restoration Site: http://mconnealy.com/vintagecameras/links.html
- Brian Wallen’s Kodak Site: http://www.bnphoto.org/bnphoto/Kodak_index2.htm
- P. Huego’s Camera Collecting and Restoration site. Among other useful topics, shows various makes of shutters progressively disassembled: http://pheugo.com/cameras/index.php?page=default&WEBMGR=c567d71629b3758d94b73dadd71e2981.
- Jurgen Krenckel’s fine camera restoration site, Vintage Folding Cameras, has many good tips, including an excellent summary of the various models of shutters. Jurgen also has a camera repair service and sells refurbished roll film cameras from his eBay store. http://www.certo6.com/shutters.html.
- Favorite Classics: An excellent site, with discussions of tools and a number of manuals for vintage cameras and light meters, as well as some repair manuals. http://www.kyphoto.com/classics/repairtools.html.
- Fallis Photo site on camera restoration. Useful tips on restoring leather as well as shutter, viewfinder, and lens cleaning: http://forum.deviantart.com/galleries/photography/818501/.
Links to Tool Suppliers
- Smallparts.com: http://www.smallparts.com/
- Micro-Tools: http://www.micro-tools.com/
- Micro-Mark Tools: http://www.micromark.com/
Links to Specialty Camera Repair and Restoration Services
- S. K. Grimes: http://www.skgrimes.com/
Links to Suppliers of Materials
- The Metal Store: http://www.onlinemetals.com/.
- Smallparts.com: http://www.smallparts.com/.
- Flitz: http://www.flitz.com/
Links to Books on Classic Camera Repair
- http://www.kyphoto.com/classics/books.html
- http://www.kyphoto.com/classics/bookreviews.html





I’m currently trying to format my blog the way you have it… nice job
Very educating blog, bookmarked the site with hopes to see more!
Nice for what you do. After 40 years my tool collection is some what larger. If you can find them you might add ring wrenches. I think Curt sells them at Microtools. Joe Lippincott wrote a nice book, “Repairing Classic Cameras”. Also if you can find them the old National Camera camera repair course books are excellent mostly written by Larry Lyles. An industrial microscope is wonderful if you do small items.
Nice job and nice site.
Dear Frank:
Thank you for the kind words. Would you be interested in writing a post to cover the topics that I didn’t include?
Pingback: narrative writing examples
My grandfather recently passed away. He had quite a collection of old cameras and slides that he kept in great shape. I still remember peeking in his workroom and watching him “tinker” with his beloved cameras. I was very fortunate to inherit them and would really love to be able to put them to use. I love photography, and my son has been showing quite an interest as well. I would love to put these pieces of my grandpas life back to work taking pictures as they were meant to be. I haven’t looked to deeply into finding someone worthy enough to help me get them back to operational, or even someone who knows more about these particular models. Can anyone give me a reference for someone in Washington state? Preferably the west side of the mountains. I miss my grandpa, and although I can’t change that he’s gone, I can at least still have a part of him. Any help would be greatly appreciated. Thank you.
Dear Jennifer:
Try the Puget Sound Photographic Collectors Society; their web site is:
http://www.pspcs.org/.
There are several contacts listed on the site. I would be happy to help you out at a distance, although I am in Northern Alberta at the moment. Can you give me some idea of the cameras in the collection?
Best wishes,
Rand